Ceramic floor tile can help visually expand narrow rooms, elongate wide rooms, and even hide a room’s imperfections if you simply use the right installation pattern. Ceramic floor tile patterns also offers wide versatility in how your floor is installed, — creative choices not possible with other flooring materials.
So, how do you know which pattern is right for your space?
The first step is understanding what your options are. Ceramic tile provides a seemingly endless array of possibilities! We’ve put together 79 floor tiles patterns to get you started, with tips on which patterns are most advantageous in different spaces.
However, keep in mind that although we’ve listed more patterns than you probably imagined existed, they’re just the tip of the iceberg. You can combine different tile shapes and sizes in any layout, and the patterns and natural looks of tiles can also affect what these layouts look like. Additionally, grout choice can impact an installation significantly by enhancing or subduing the pattern.
On that note, let’s take a look at some patterns you may consider.
Floor Tile Pattern Ideas With One Tile
Maybe you already purchased your tiles in a single shape, or maybe you just want to keep things simple. Either way, choosing a pattern that uses a single tile size and shape can be beneficial.
Here are some one-tile patterns to explore
1. Square Grid (Straight Lay)


Because of its simplicity, the straight lay/standard tile grid pattern blends easily with a room’s other design patterns. This gives you maximum flexibility to mix and match with any type, color, or texture of ceramic floor tile. Choose a monochromatic scheme for a clean and straightforward appearance, or use the straight lay tile pattern to highlight a more decorative tile design.
The straight lay pattern complements any tile size, including large-format panels, and it’s the perfect match for ceramic tile that looks like natural stone.
[Related: How to Make Square Tile Unique]
2. Mini Grid


Take a standard tile grid and swap in smaller tiles (typically 2 × 2, 4 × 4, or 6 × 6) for a retro, minimalist look. Mini tile grids can feature grout that contrasts with the tile color to highlight the grid and create a texture with the pattern.
3. Checkerboard

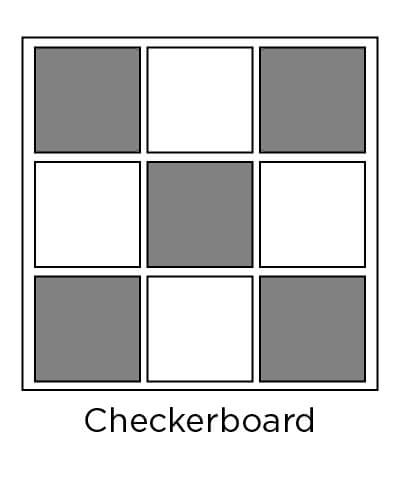
The checkerboard floor tile pattern is a timeless and versatile option that can equally complement a modern farmhouse, classic revival, ranch redo, or urban loft.
The black and white version of this ceramic flooring design is classic. Mix it up by installing your pattern diagonally, offsetting the grid slightly, adding bold colors or simply checkerboarding the same floor tiles with two different finishes (matte and gloss). All you need are two different floor tiles of the same size!
4. Staggered Grid (Brickwork Square)
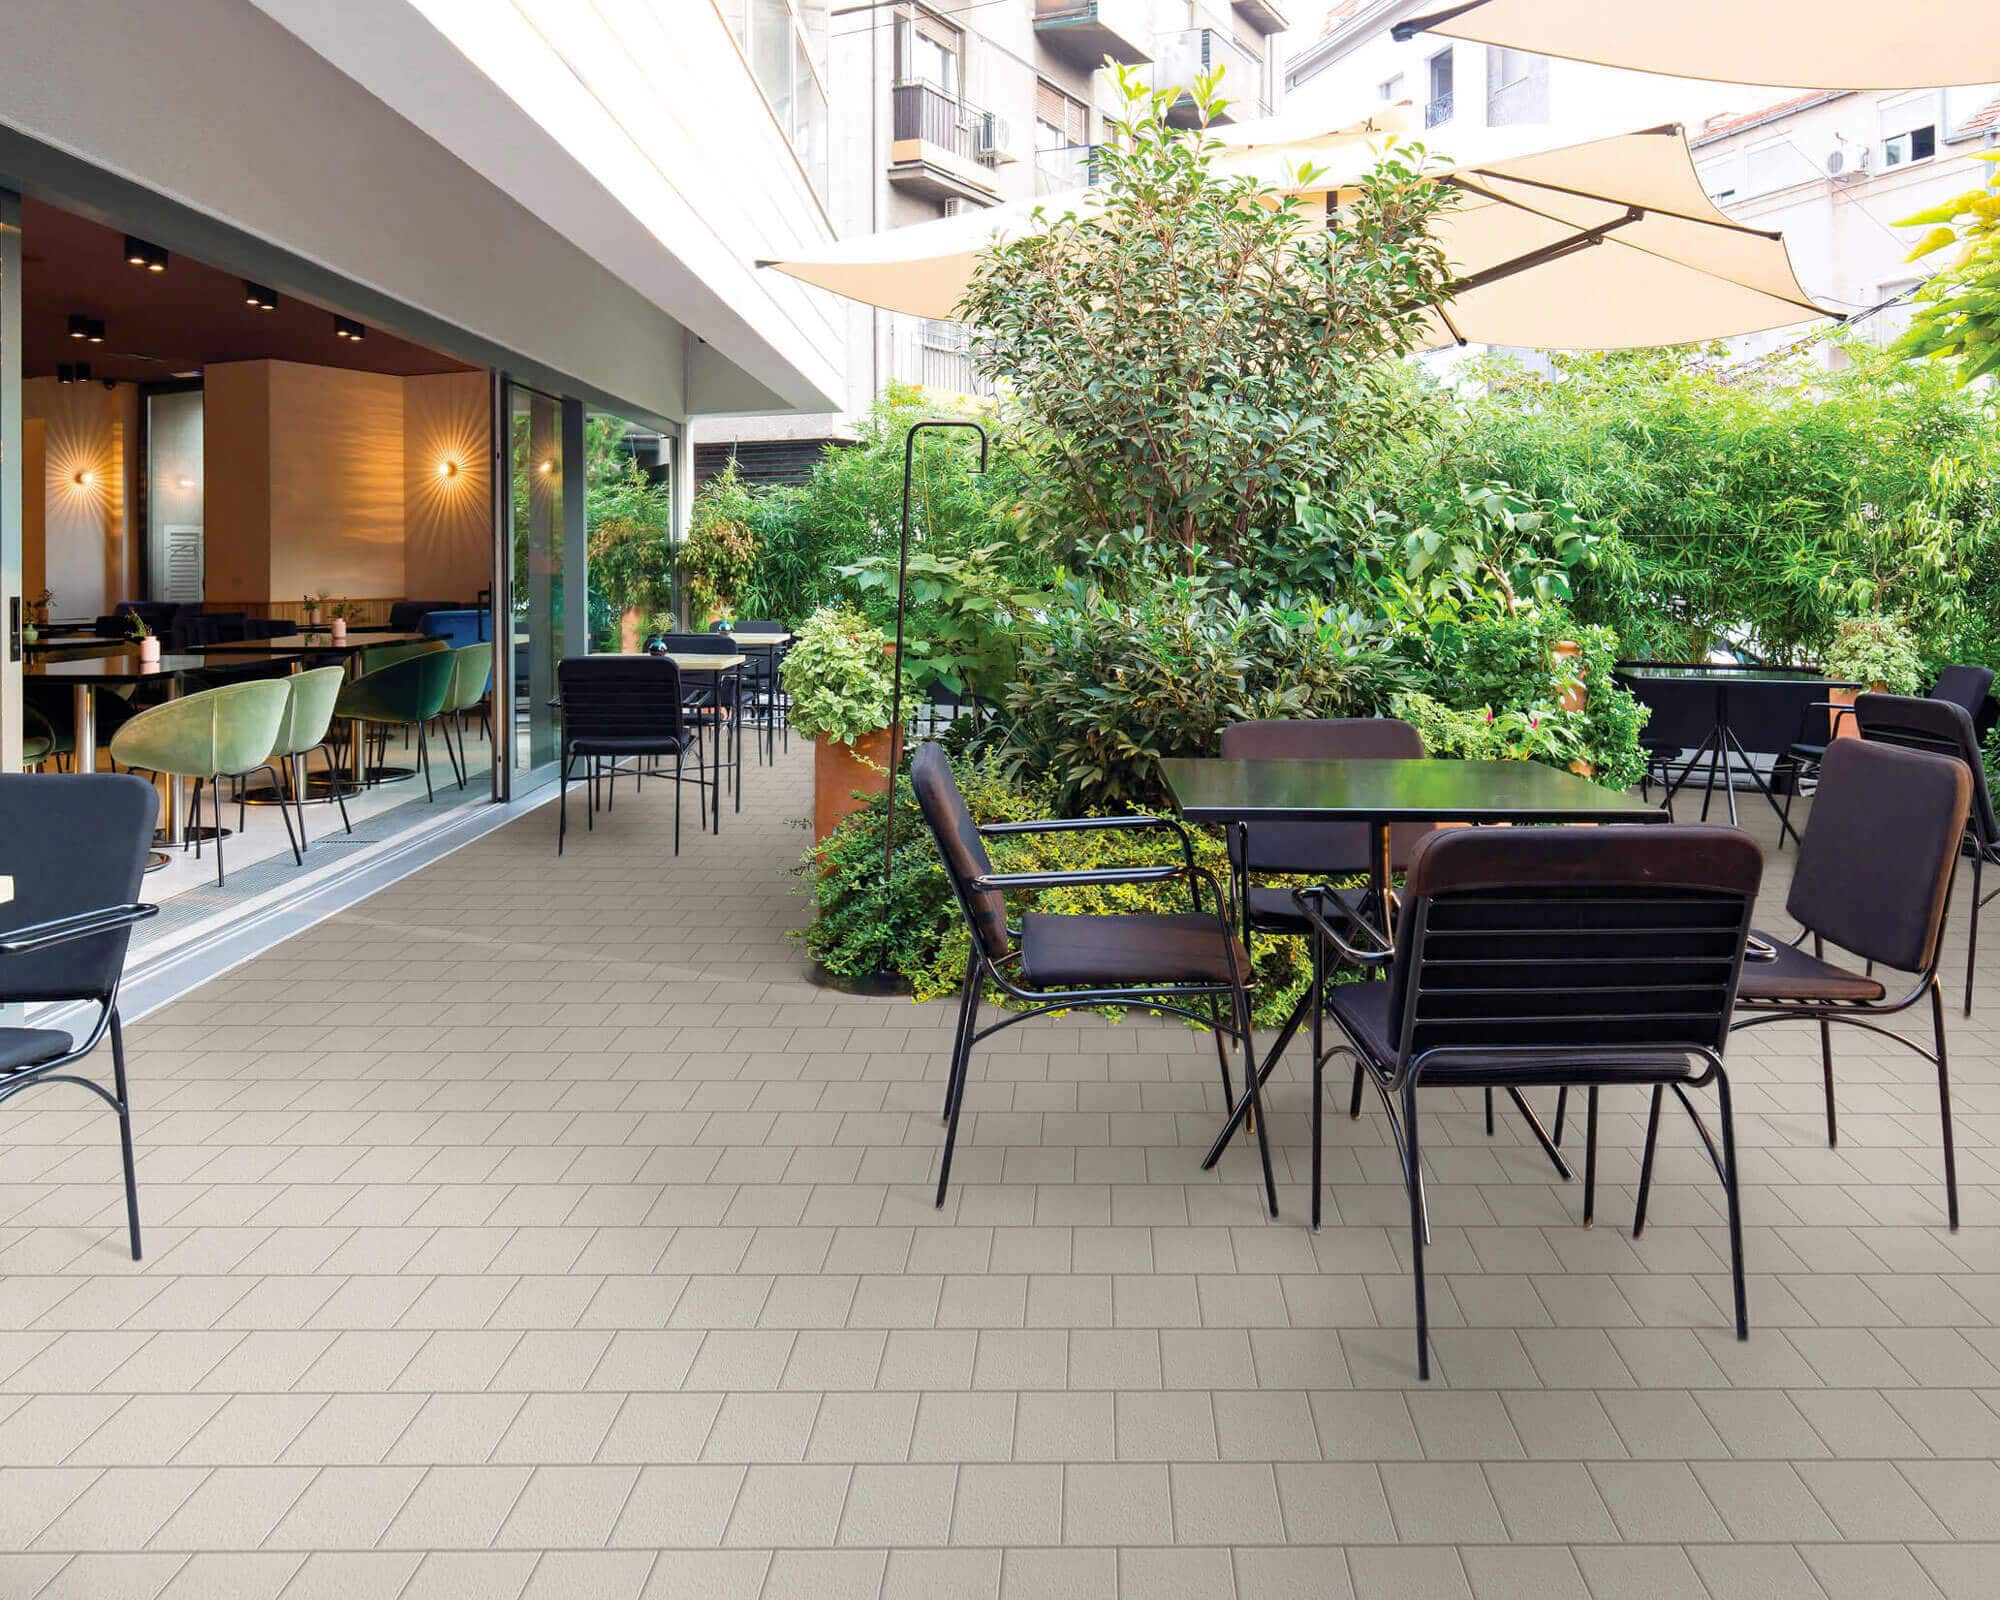

The staggered tile grid simply takes square tiles and offsets them. This pattern is like the subway/brickwork tile pattern, except it uses squares rather than rectangles (thus its alternate name, “brickwork square”).
While a 50% offset is typical, you can lay your tiles with any offset you choose.
5. Diagonal Grid
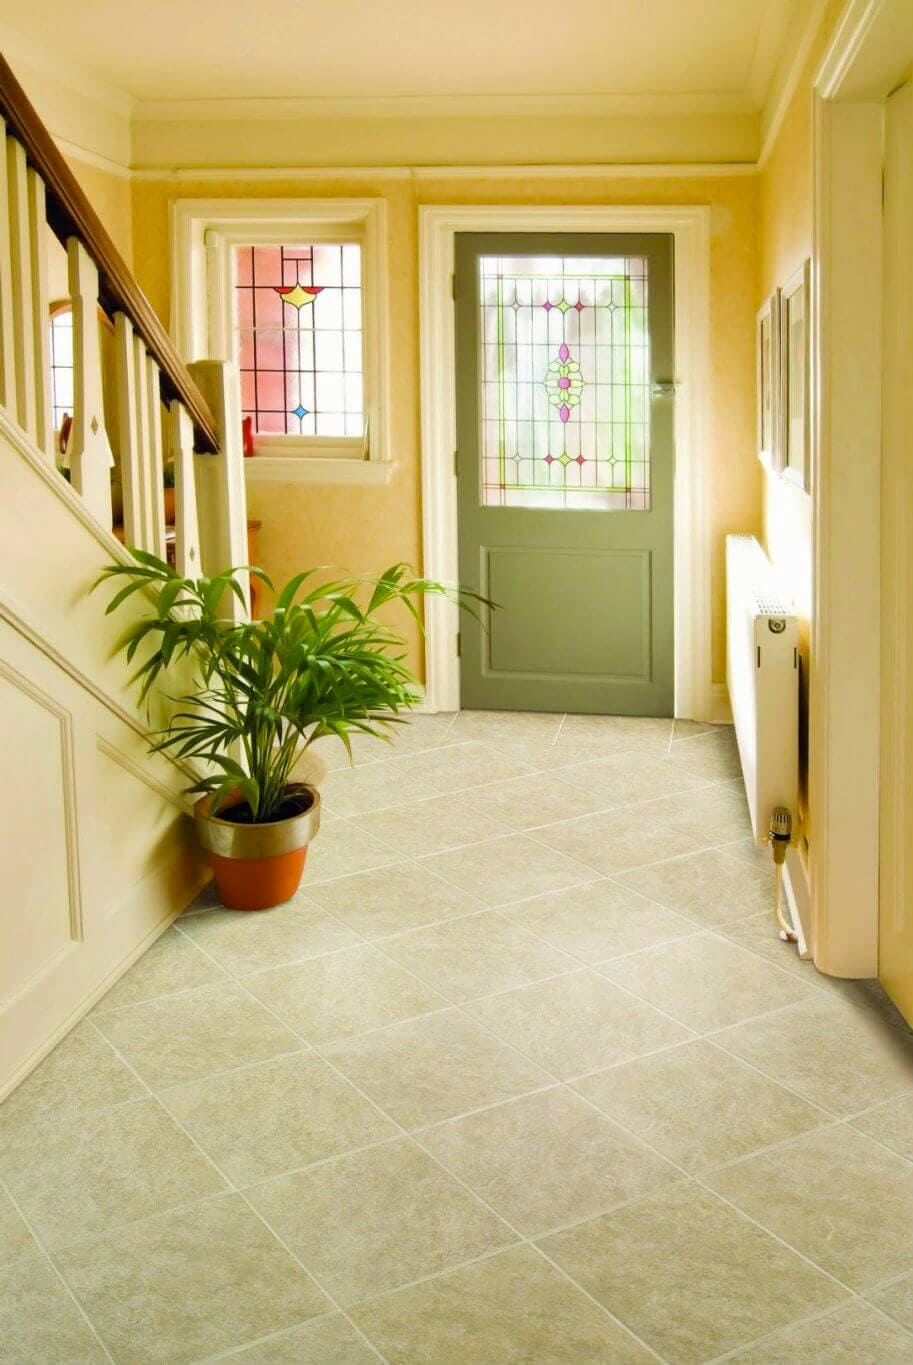

The diagonal grid tile pattern turns the straight lay tile pattern on its head 45 degrees, shifting the focus of any small room with the pattern’s widening angles. If you want a little more visual interest with the same ease of installation as the straight lay tile pattern, the diagonal grid tile pattern does the trick.
Use this arrangement to open up a tiny bathroom, expand a smaller kitchen or create flow-like movement through a straight hallway.
6. Horizontal Grid

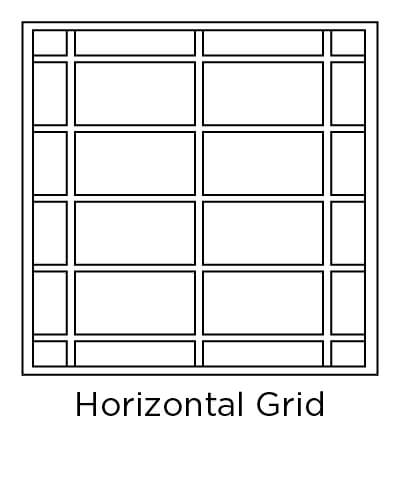
Straight lay grids are possible using rectangles as well. A straight grid using rectangles creates a modern, minimalist surface that works equally as well in large-format ceramic tile as it does in mosaics.
The simplicity and elegance of this tile pattern make it ideal for tiles with texture. Color plays a significant role when using this grid — it shifts easily from serene to dramatic depending on the color choice. Using rectangle tiles in a straight grid installation gives one of the easiest installation patterns pizzazz without complexity.
Keep in mind that if you go this route, you have the choice between a horizontal or vertical grid. Laying your tiles horizontally visually widens your space.
7. Vertical Grid


Alternatively, you can lay your rectangle tiles vertically to visually elongate a room.
8. Running Bond
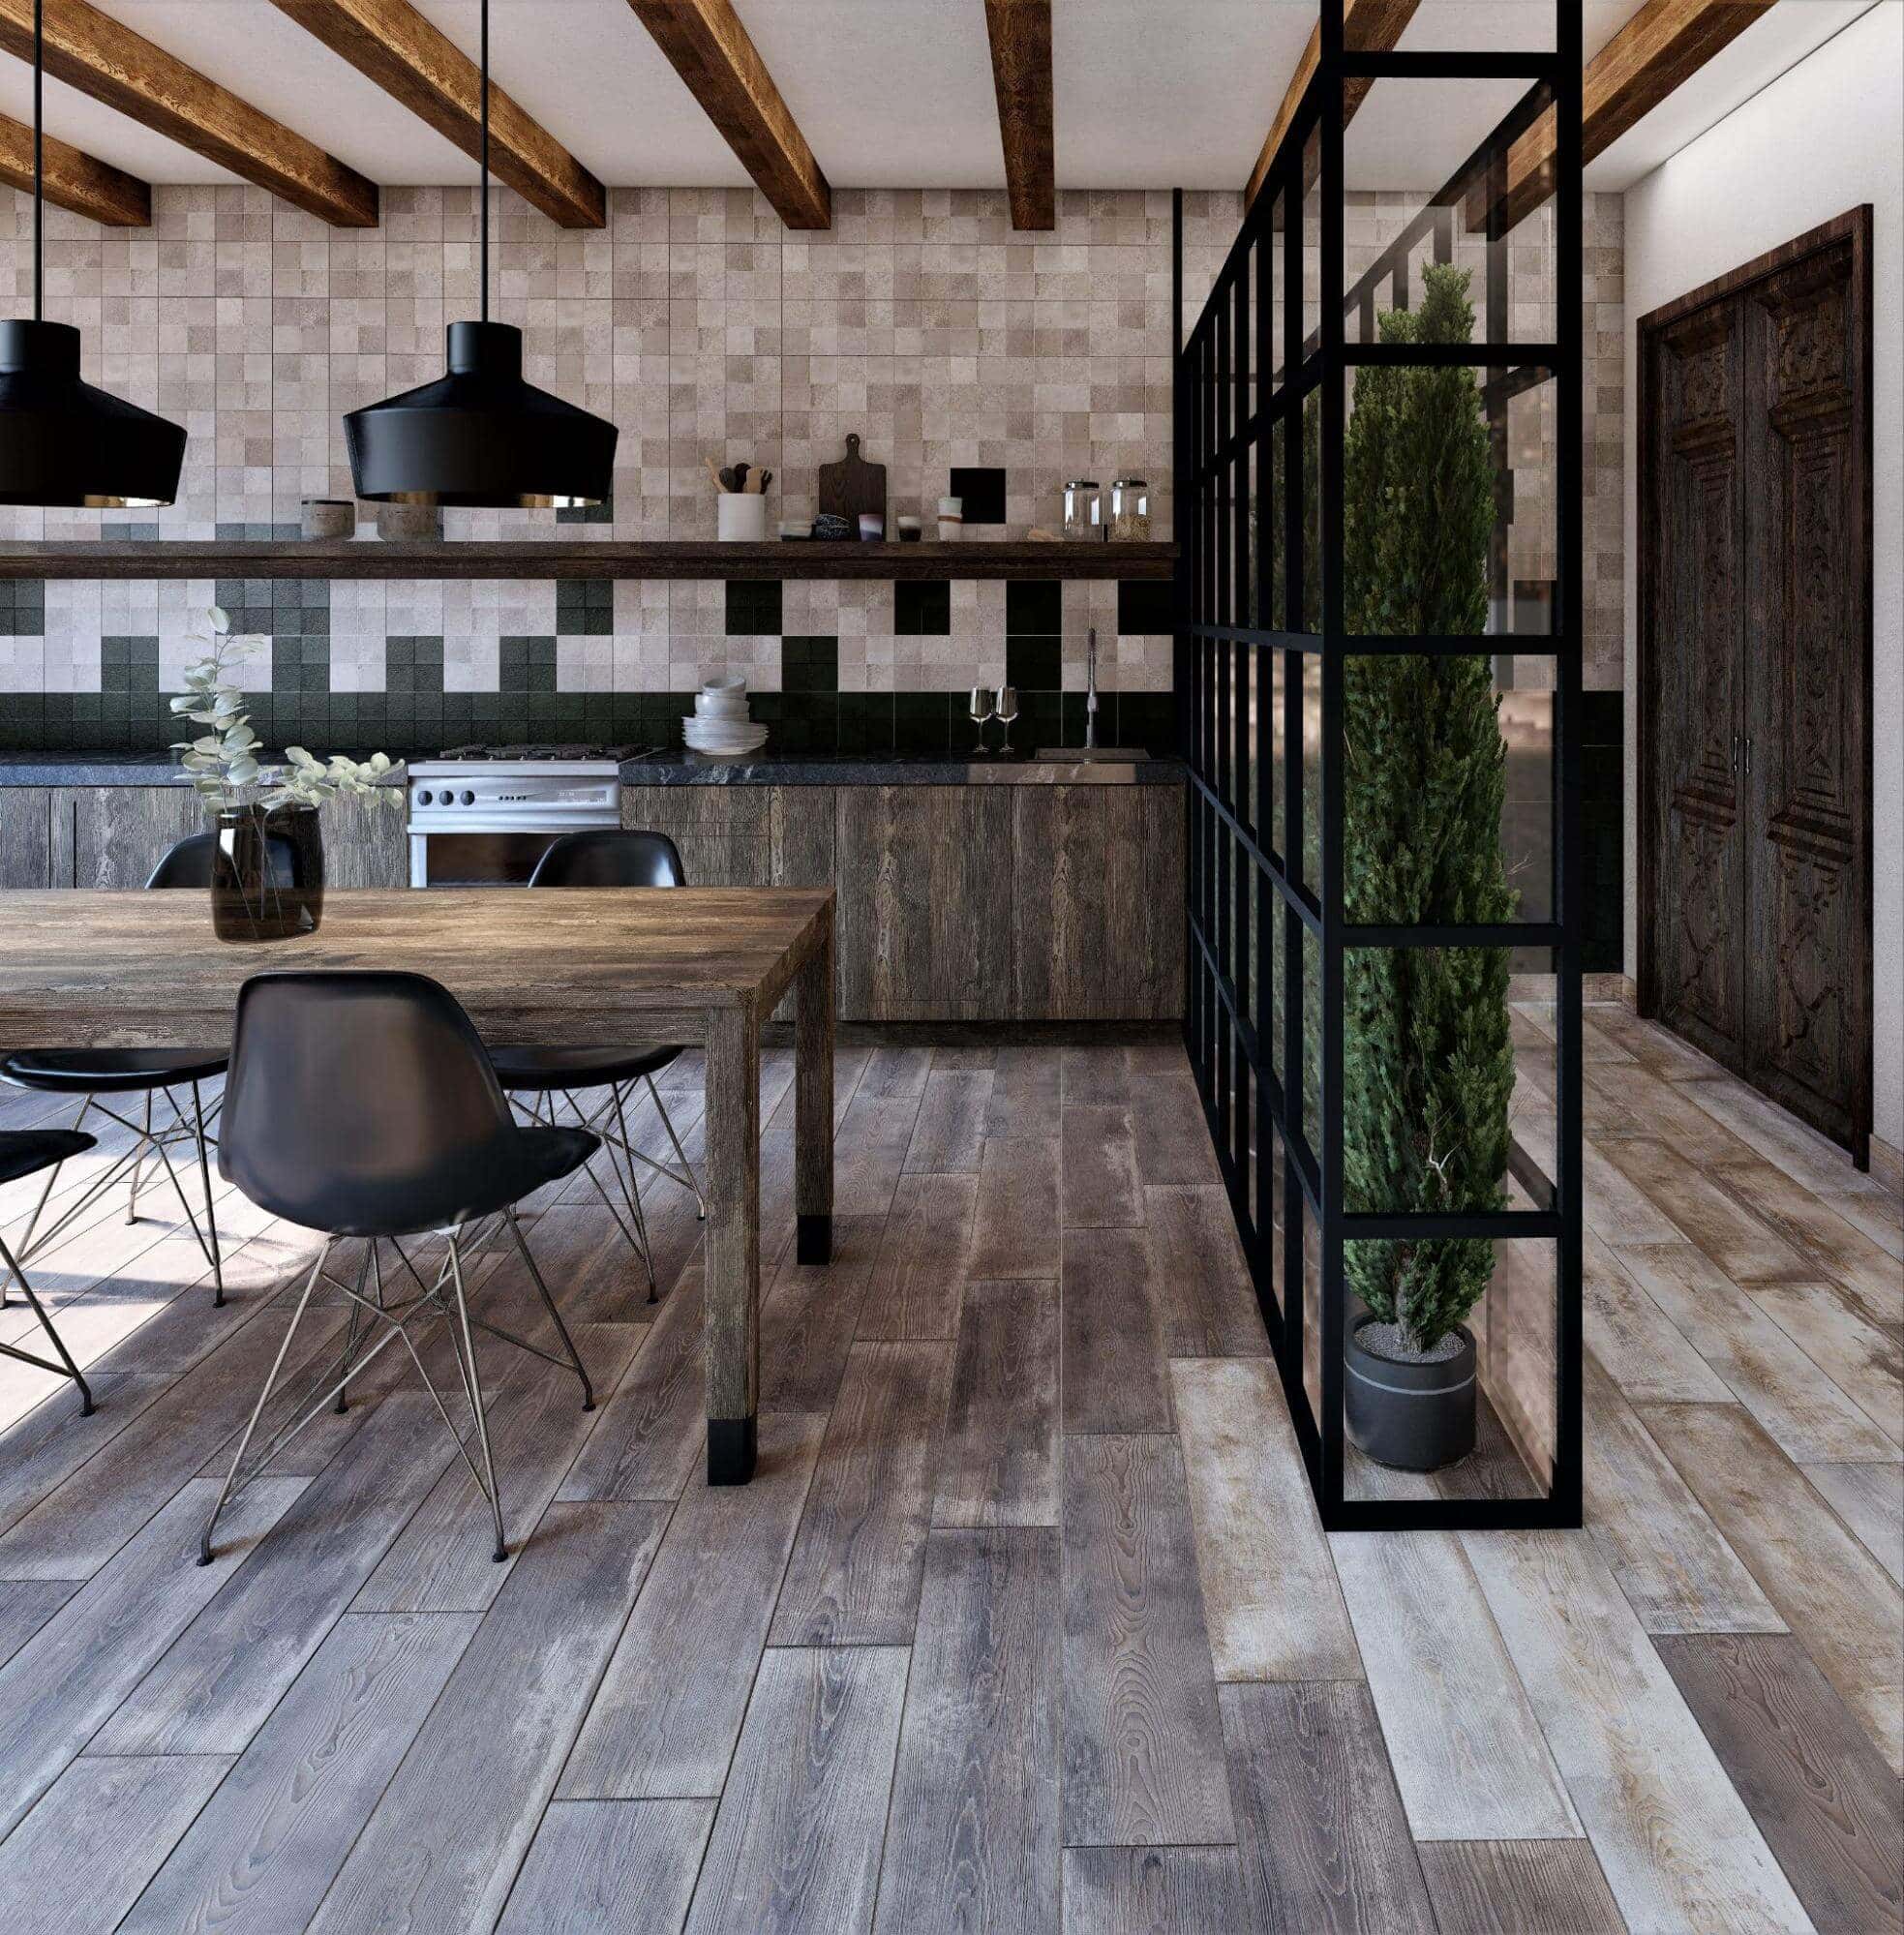

Draw eyes away from minor flaws in a room with the running bond tile pattern. Simple to install yet visually stunning, this staggered configuration is often used to help hide walls out of square or to break up the pattern of existing decor. You can also tilt the pattern at a 45-degree angle to give your flooring an intentional traffic flow.
Running bond floor tile patterns use a 33% to 50% row offset from tile to tile. (Note: A 50% offset is often called “brickwork.”) Using wood-look ceramic floor tile, these irregular offsets can create a look indistinguishable from hardwood but with all the benefits of ceramic floor tile’s water-, stain-, scratch-, and fade-resistant features.
9. Subway (Brick)


We often see subway tile in backsplashes and wall applications, but that doesn’t mean it doesn’t make a good floor tile pattern! In fact, you’ve likely spotted this pattern combined with larger rectangle tiles for flooring.
As with the brickwork square pattern, the 33% to 50% offsets are typical, but offset percentages can vary depending on the look you want to achieve.
[Related: Everything You Need to Know About Subway Tile]
10. Chevron

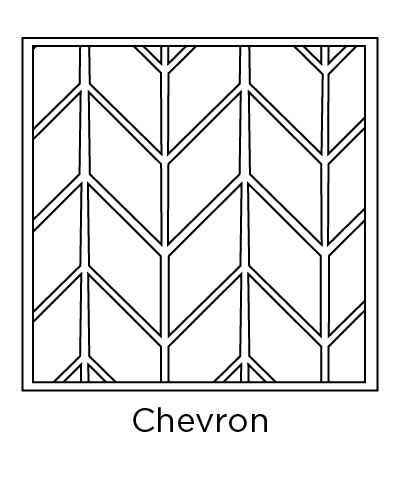
The chevron pattern forms a zigzag design by combining rectangle tiles with angled ends. This is a beautiful choice for elongating or widening angles in a space.
Like the running bond tile pattern, the chevron pattern can carry your line of sight along an intended path or toward a focal point.
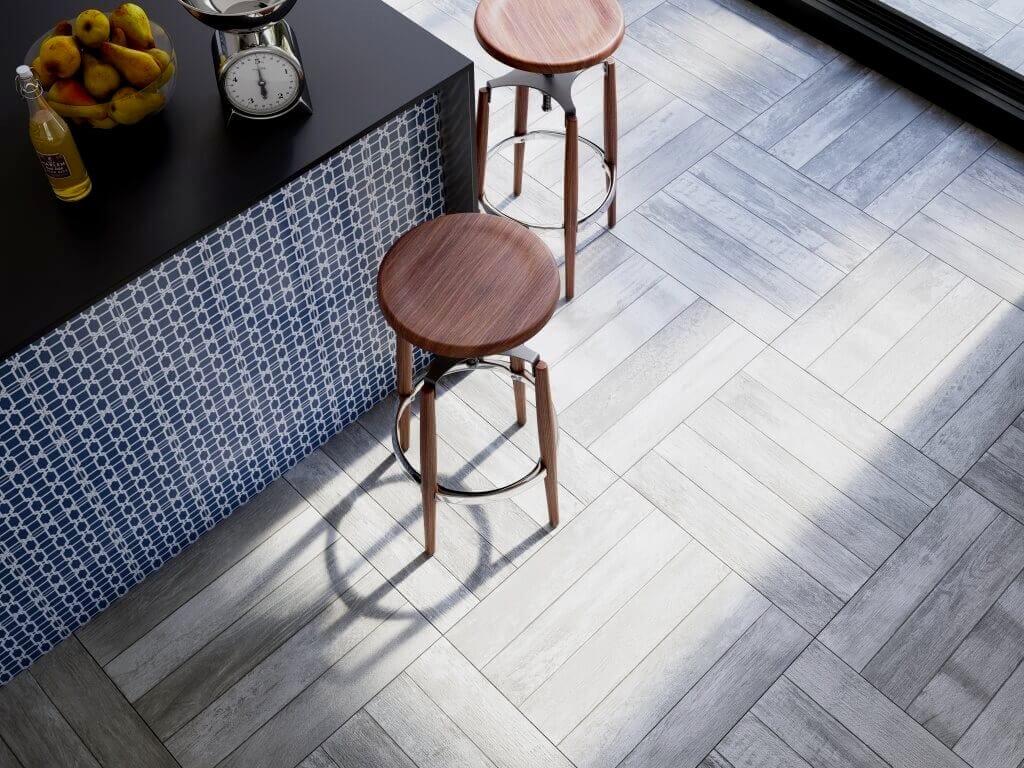
11. Herringbone Pattern

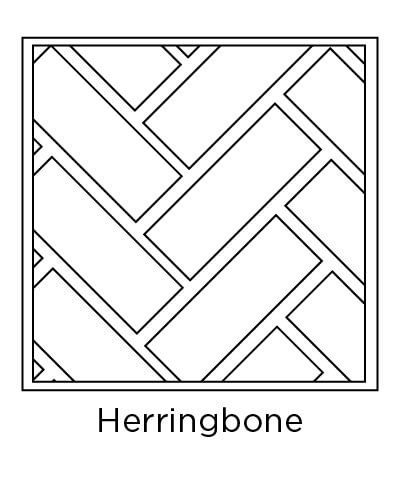
The difference between the chevron pattern and the herringbone pattern lies in the zigzag. The tiles in the chevron fmeet at their angled ends to form a zigzag. The herringbone pattern creates a V-shaped design by placing rectangle tiles in alternating 45-degree angles. This flooring pattern features widening angles that work well in smaller rooms.
As with the chevron floor tile pattern, this tile design can purposefully lead you through a space. Enjoy the ability to create fairly intricate-looking floor designs with one tile shape and size!
12. Crosshatch

The crosshatch pattern shares the complex broken grid look of the herringbone floor tile pattern.
To create this design, lay pairs (or multiples) of alternating stacks of tiles in a perpendicular pattern. For large floor spaces, increase the number of tiles in each stack.
13. Vertical Crosshatch and Checkerboard 2.0


Rather than alternating stacks of the same number of tiles, the vertical crosshatch pattern alternates a stack of tiles with a single tile. Lay the stacks of tile vertically to create an upward sense of motion that visually helps elongate a space.

The vertical crosshatch pattern is very similar to the checkerboard 2.0 pattern, with one slight difference — the checkerboard 2.0 pattern is simply rotated 90 degrees!
14. Circular Rectangular

Create a circle using rectangular tiles with the short edges facing inward. Expand this pattern outward, and voila — you have the circular rectangular layout.
This pattern is ideal for circular spaces or anywhere you want to draw attention to a central focal point.
15. Penny Round


This round tile (essentially penny-sized circular tile) is a great choice for creating a vintage look because this style has a timeless quality that continues to be very popular. In fact, penny round tile was a 2022 bathroom tile trend.
16. Hexagon

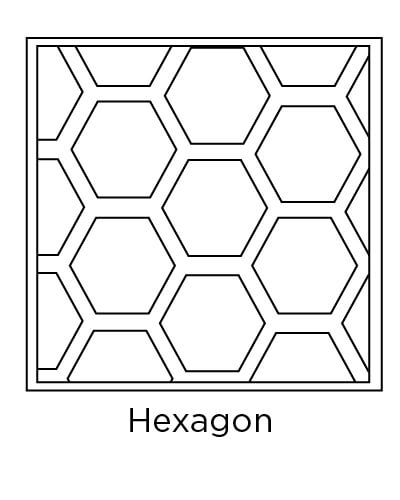
A favorite for just about any application, including flooring. Hexagonal tiles add a contemporary, playful vibe that you can play up or down with your color and other design choices.
As with many of these patterns, you’ll want to use mosaic tiles for smaller spaces and larger hex tiles for bigger spaces.
[Related: Unleash the Creativity of Hexagon Tile: Hexagon Tile Uses and Design Ideas]
17. Picket Fence

Elongate your hexagon tiles, and what do you have? Picket fence tile.
Resembling traditional white picket fences, picket fence tile can be laid horizontally or vertically.
18. Horizontal Corridor Floor Tile Pattern

The horizontal corridor pattern is a variation on the traditional corridor pattern, which you’ll see below. As with the original corridor pattern, the horizontal corridor pattern creates visual walkways.
The horizontal corridor pattern does this using only rectangular tiles, and it alternates rows of horizontal rectangle stacks with rows of vertical rectangle stacks.
19. Spaced
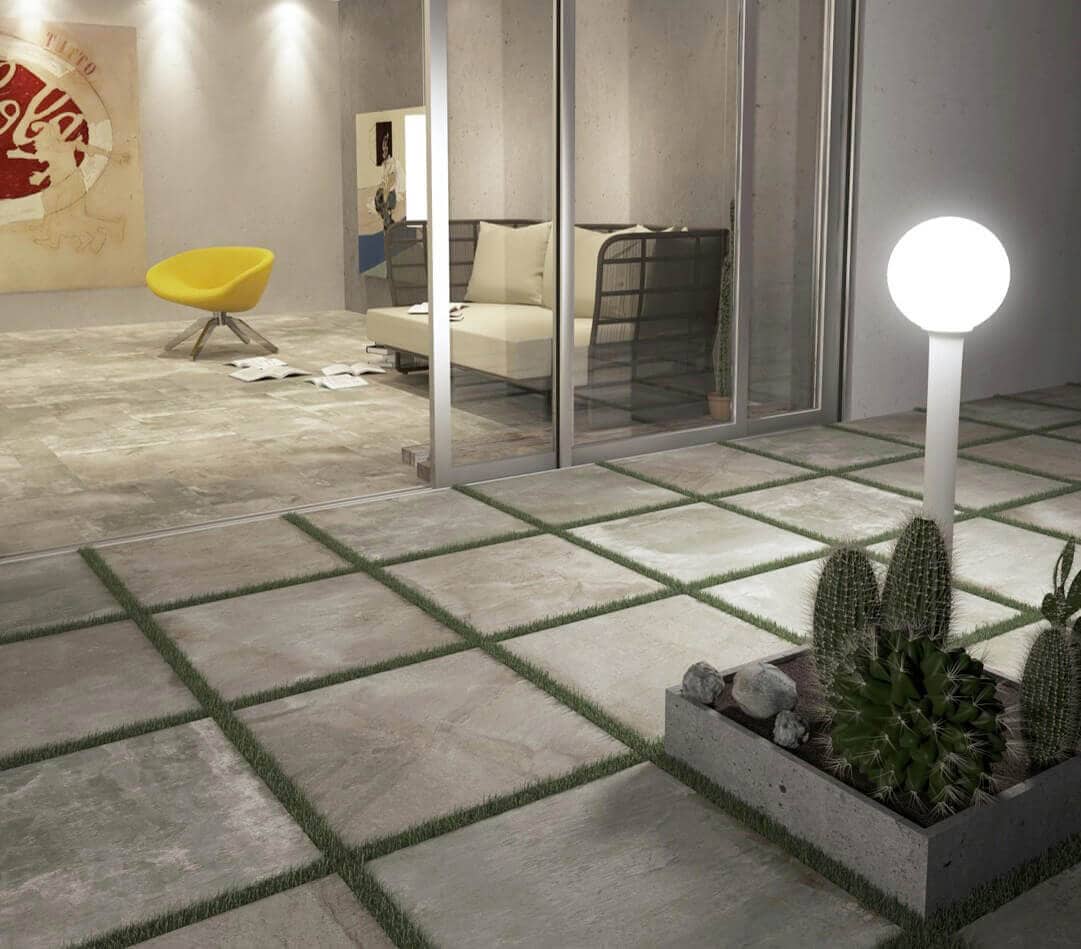
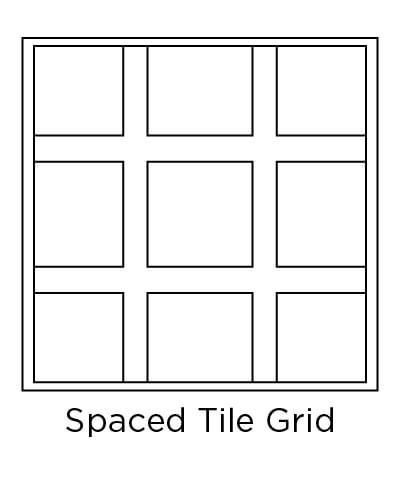
We’re back to the standard tile grid, with another twist. Thanks to their added durability, you can lay porcelain tile pavers directly on outdoor surfaces, such as grass. This enables you to space your tiles out in a grid (see the example above) or however you please!
[Related: New 2 cm Gauged Porcelain Tile Paver Specifications Released]
20. Gauged Porcelain


Our last single-tile layout isn’t so much a pattern as it is an absence of pattern.
Gauged porcelain tile panels/slabs come in sizes up to 10 x 15 feet. Because of gauged porcelain tile’s sheer size, you can barely notice its grout lines. This quality effectively eliminates any pattern from your flooring.
If minimalism is your aim, this (anti)pattern is for you.
[Related: Tile Trend Ideas: XXL Tile]
Floor Tile Pattern Ideas With Two Tiles
Next, we’ll add another tile size or shape to the mix to review your options for two-tile floor patterns. Two-tile patterns significantly expand your choices and can add further visual interest to your flooring.
21. Alternating


This is as simple as it gets with two-tile partners: Simply alternate rows of squares with rows of rectangular tiles to achieve the alternating pattern.
22. Alternating Horizontal

The alternating pattern has horizontal and vertical versions as well.
Rather than having alternate rows of square and rectangular tiles, the alternating horizontal pattern alternates the squares and rectangles themselves within a single row. Be sure to lay the rectangle tiles horizontally and offset the rows so that the squares and rectangles in adjacent rows don’t align.
23. Alternating Vertical

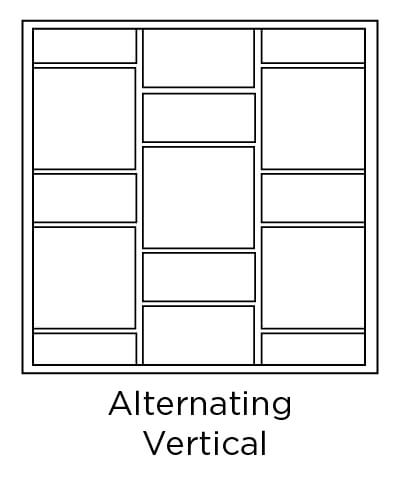
The alternating vertical pattern alternates square and rectangular tiles in columns rather than rows. Again, remember to lay the rectangle tiles horizontally and offset the columns.
24. Inserted Herringbone

Like the traditional herringbone pattern but instead of overlapping the rectangular tiles to create the L shape of the zigzag, this pattern adds a square tile where the rectangles would meet.
25. Octagon and Dot

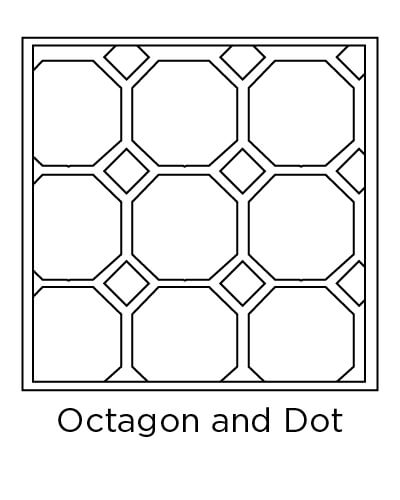
The octagon and dot (diamond) pattern has been popular since before the Victorian era as a mosaic tile design. Today, many octagon and dot mosaics are available on sheets for ease of installation. You’ll also see large-scale octagon and dot floor tile patterns in larger spaces.
As with the checkerboard tile pattern, the black and white octagon and dot combination is a classic choice. Try these variations for a unique look:
- Reverse the dominant color (black octagons and white dots).
- Change the tile colors altogether.
- Use the same color for both tile shapes.
- Use a contrasting colored grout.
26. Hopscotch
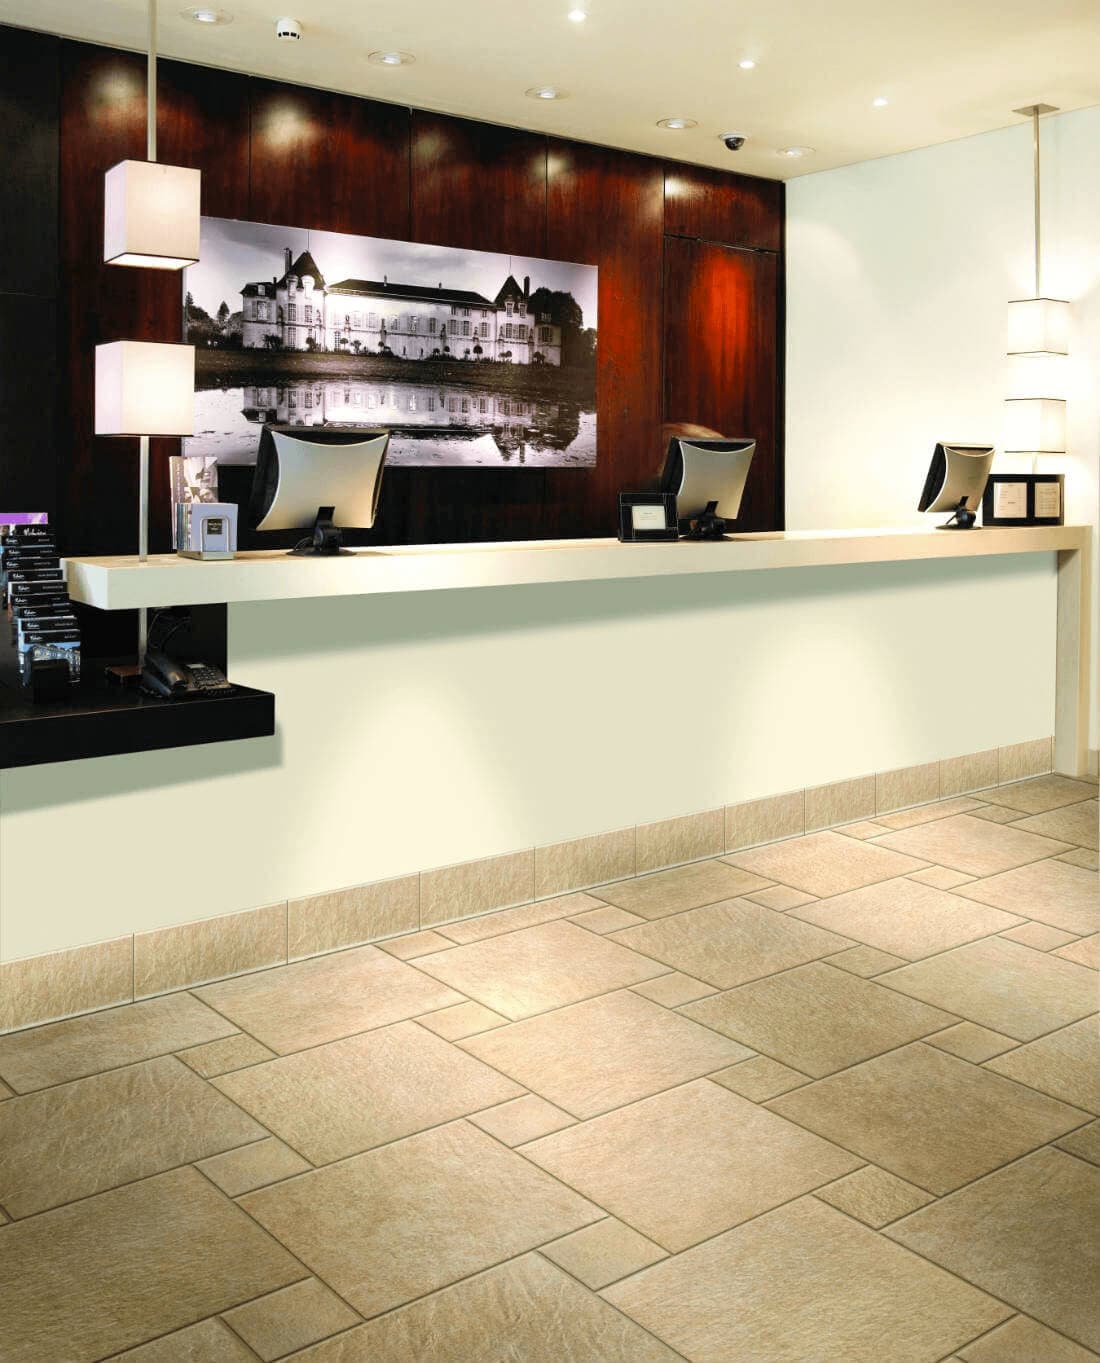
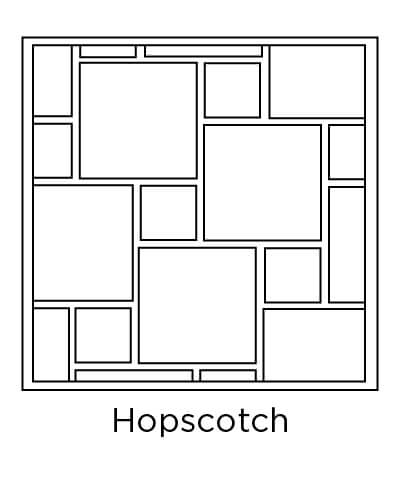
The hopscotch pattern comprises a combination of large and small squares that create a playful, interlocking design. Stick with a consistent color scheme to give the pattern itself all the attention, or center the design by using a contrasting tile color for the small squares.
27. Windmill

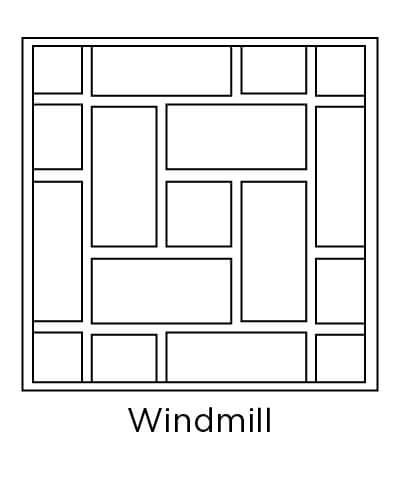
The windmill pattern is formed using four rectangular tiles to create a frame around a center square tile.
You can use this floor tile pattern in a wide range of sizes. Mosaic windmills are attention-grabbers and best suit smaller areas, such as bathroom tile, paired with a simple decor scheme. Many manufacturers mount mosaic windmill patterns on strips or sheets for easier installation.
Large-scale windmill patterns offer excellent opportunities to showcase unique tiles, such as tile printed with a Mexican Talavera design. Place the unique tile in the center position, and then frame it with monochromatic rectangle tiles.
28. Pinwheel

The pinwheel pattern is similar to the windmill pattern, except it uses both square and rectangular tiles to create the frame surrounding the central square tile. Because of this added complexity, the pinwheel pattern creates even greater visual interest. If used for large floor spaces, opt for larger tiles to avoid overwhelming the layout.
29. Multi-Pinwheel
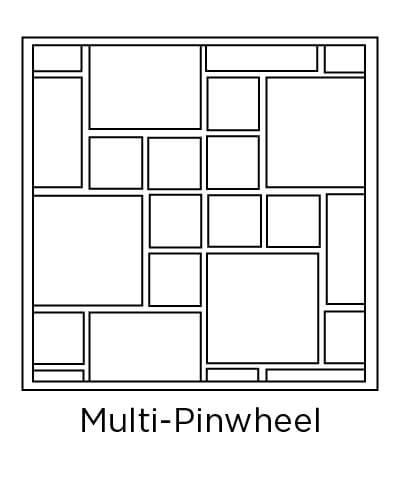
Take the pinwheel unit and then use that unit to create an additional pinwheel pattern around a center axis. There you have it: a multi-pinwheel floor pattern! Whoa.
The expert craftsmanship of a qualified installer is key to helping you create this complex vision. Likewise, rely on your Certified Ceramic Tile Specialist (CCTS) to help you select tile shapes and colors that will work for both the original pattern and then as it is multiplied across the floor.
30. Corridor
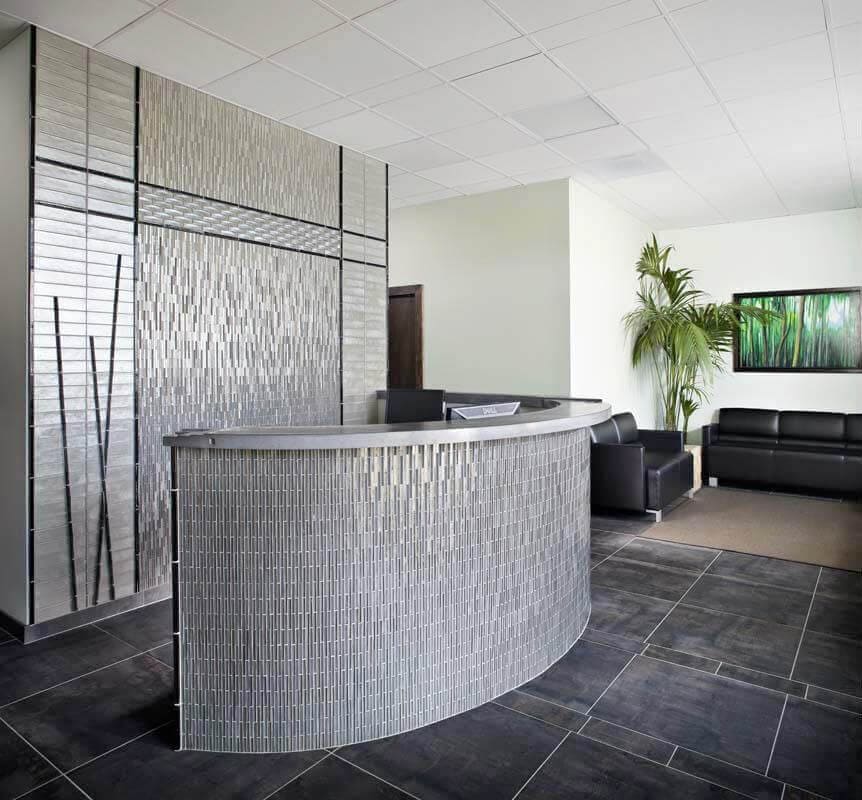
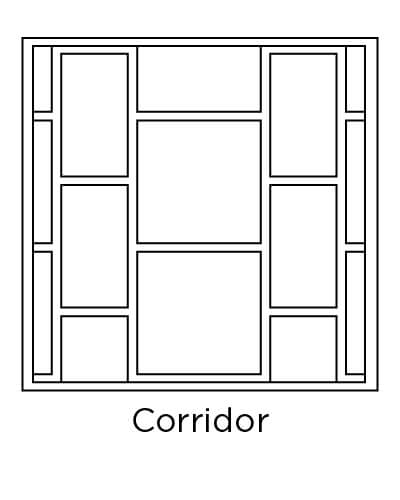
The corridor pattern creates repeating “walkways” — thus its name. This is basically a tile pattern where columns of smaller rectangle tiles or square divide areas of tile.
You can make each “corridor” into divisible tile sizes for the creative example we’ve shown. If you want an interesting backdrop for a monochromatic color scheme, you’ll find a friend in this tile design.
Corridor tile patterns are often used for wayfinding in public spaces to help direct the flow of movement and/or to direct attention to a specific area.
31. Vertical Corridor
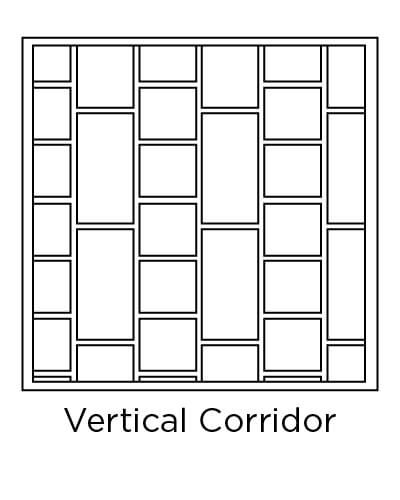
As with the traditional corridor pattern, the vertical corridor creates visual walkways. However, the vertical version opts for smaller squares so that the rectangles (laid vertically) do the talking, creating a vertical sense of movement.
32. Corridor Stacked
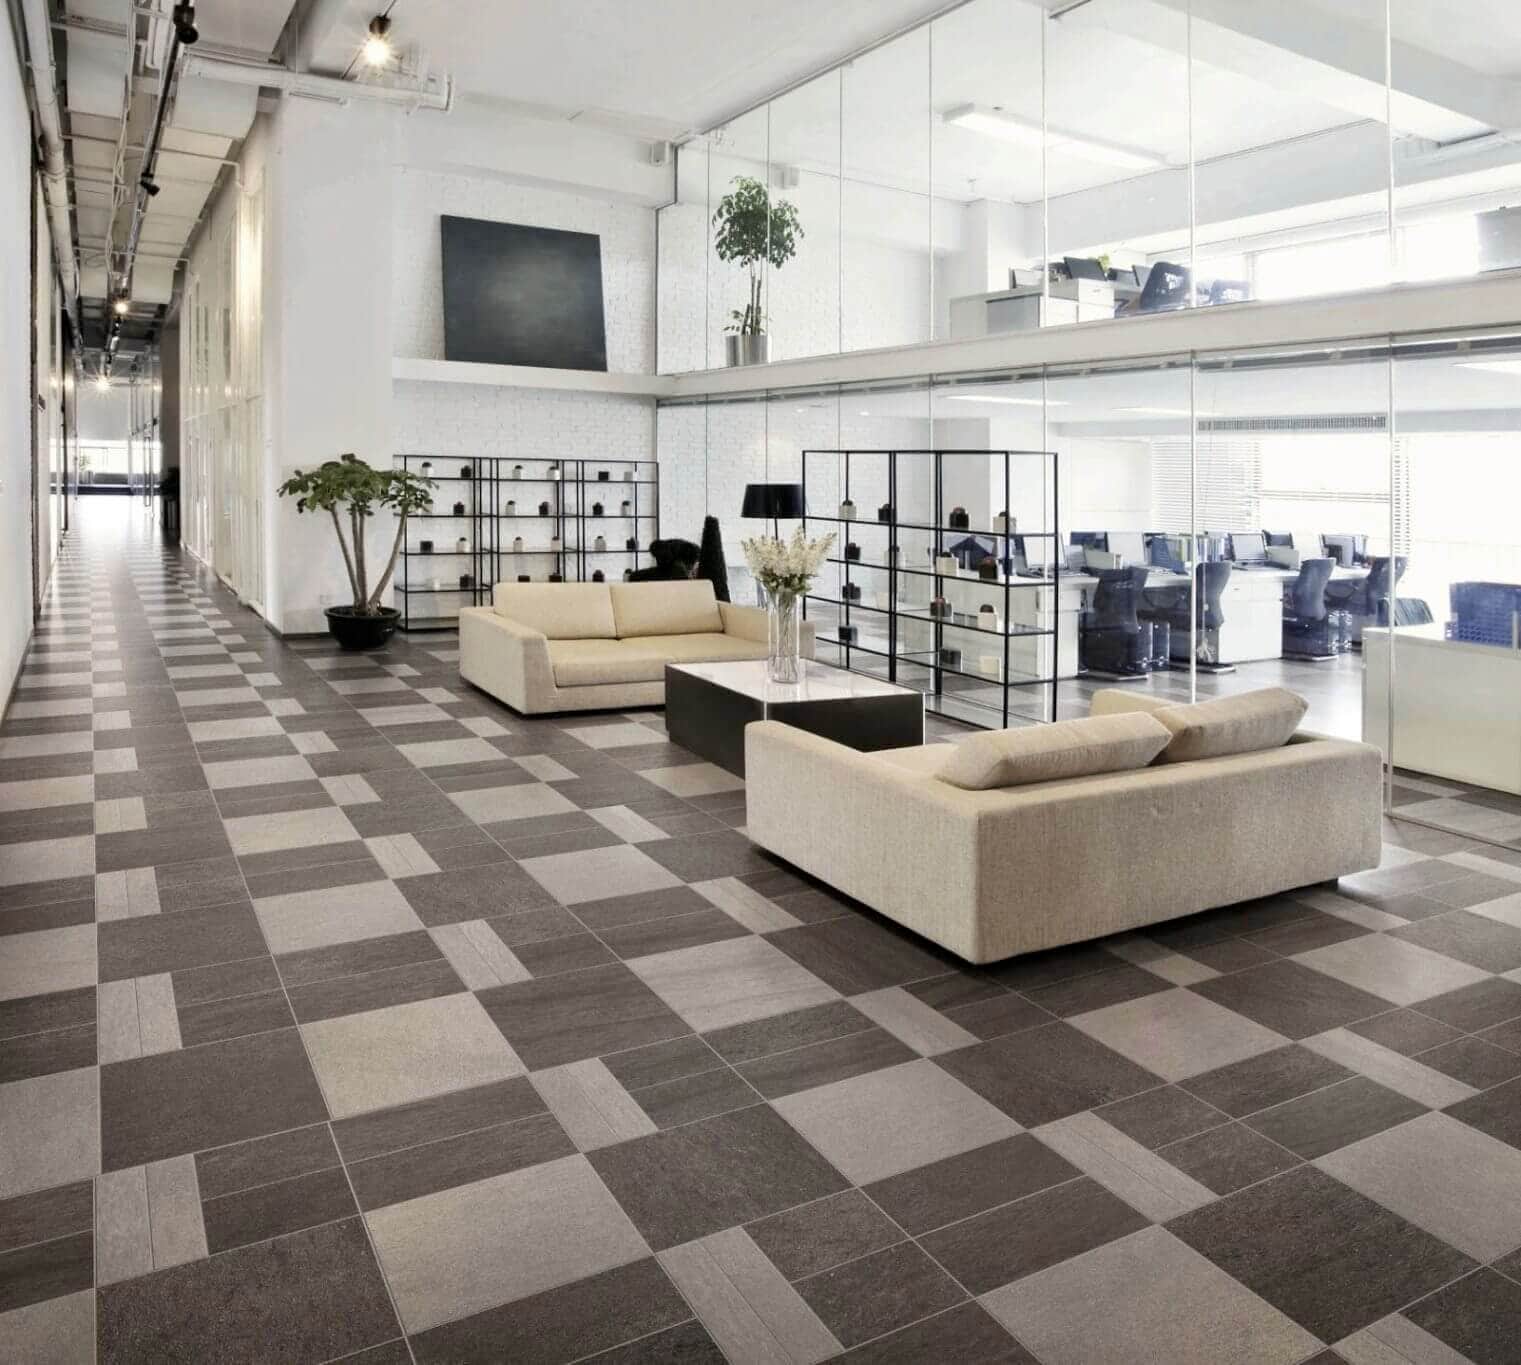
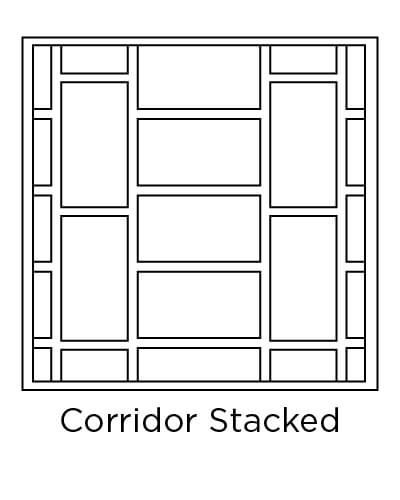
Add rows of horizontal stacked rectangular to the vertical corridor pattern, and you have the stacked corridor pattern.
33. Basketweave
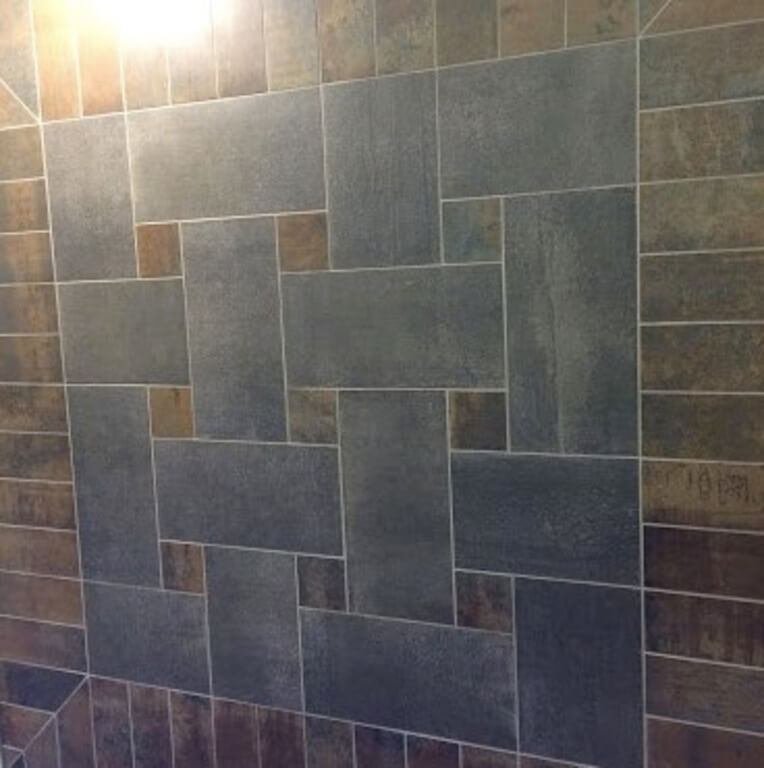
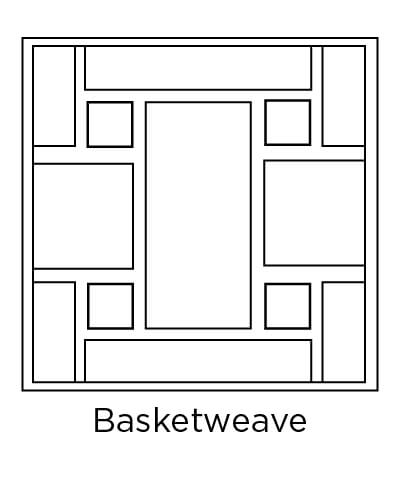
The basketweave pattern gets its name from baskets woven from fibers at 90-degree angles. The rectangle and square tiles forming this pattern create a beautiful feature and focal point.
This pattern is especially impressive when laid across the entire surface of a floor. You can achieve it with large or small tiles, although large tiles show off the pattern’s design. The basketweave floor tile pattern looks complicated, but that’s simply a trick of the eye — it’s rather straightforward to install.
34. Horizontal Crosshatch/Basketweave
It’s the crosshatch pattern, but it alternates a square tile with two vertical rectangular tiles.
35. Cobblestone

The cobblestone pattern incorporates both square and rectangle tiles to mimic the look of cobblestone streets. This is a particular favorite for outdoor walkways — and for good reason.
36. Stepping Stone

Similar to porcelain tile pavers placed with space in between them, the stepping stone pattern creates the look of, well, stepping stones. However, rather than space square tiles out, this pattern uses smaller squares to fill the space between them.
37. Lacework


Lace, on the floor? Think of it as repeated shapes making a pattern combined with other repeated shapes, also making a pattern. In the example above, follow your eye across the square tiles and then the rectangular tiles and notice the overall pattern created by alternating the square and rectangular tiles.
38. Brickweave

The brickweave pattern consists of a motif with three tiles using only two different types of tile: a large square and two small rectangular tiles.
Lay one rectangle tile vertically to the right of the square, and place the other rectangle tile horizontally underneath the first two tiles. The horizontal tile should offset the tile by 50%.
39. Adapted Picket Fence


Although an adaptation of the picket fence tile pattern, this layout couldn’t create a more different look. The layout adds square tiles to the mix, and then it surrounds them with elongated hex tiles. The effect, in our opinion, is nothing short of regal.
40. Large Catwalk
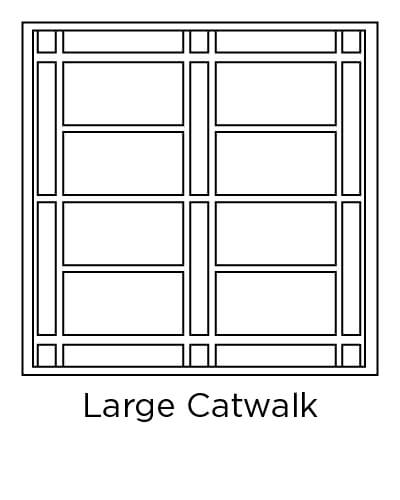
The catwalk pattern is similar to the alternating pattern. However, it creates a wider walking space, so to say, by aligning two stacked horizontal rectangle tiles with a very thin vertical rectangle tile. You can admire the pattern — and yourself — as you make your way up and down the catwalk!
41. Tic Tac


Alternate rectangle and square tiles within a single column. Then, for the next column, shift the tiles so that the square in one column line up with the middle of the rectangular tiles in the adjacent columns.
This last part is important — otherwise, you could end up confusing the tic tac pattern with the lacework pattern.
42. Transition/Staggered
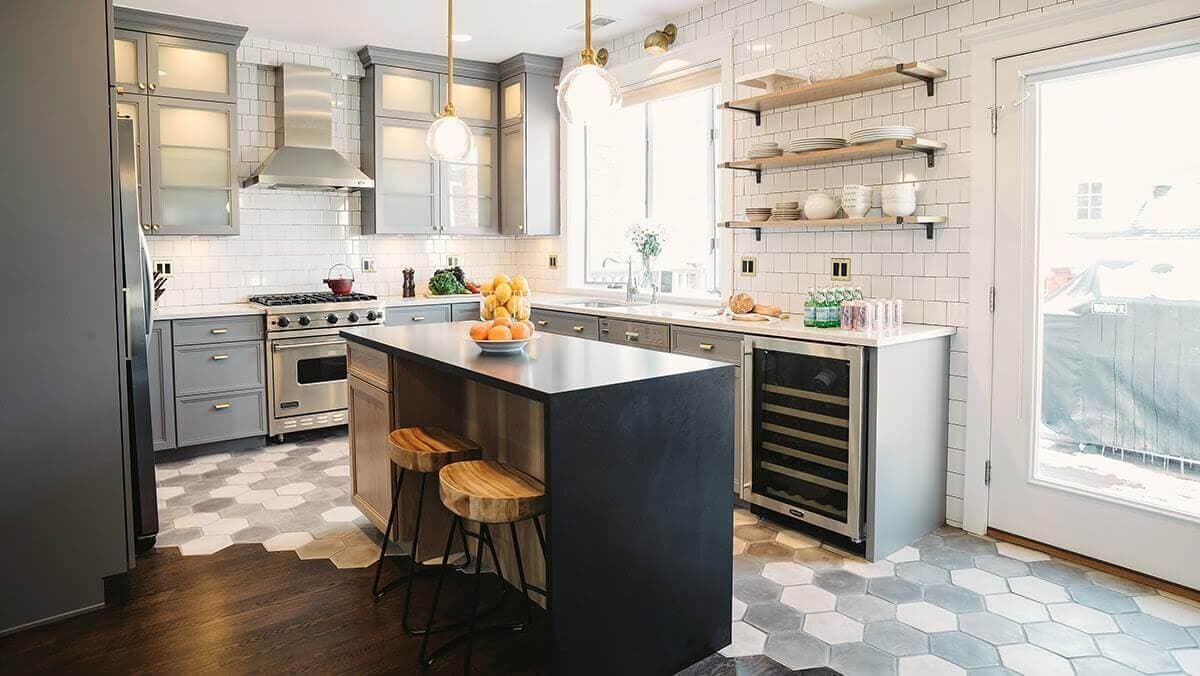
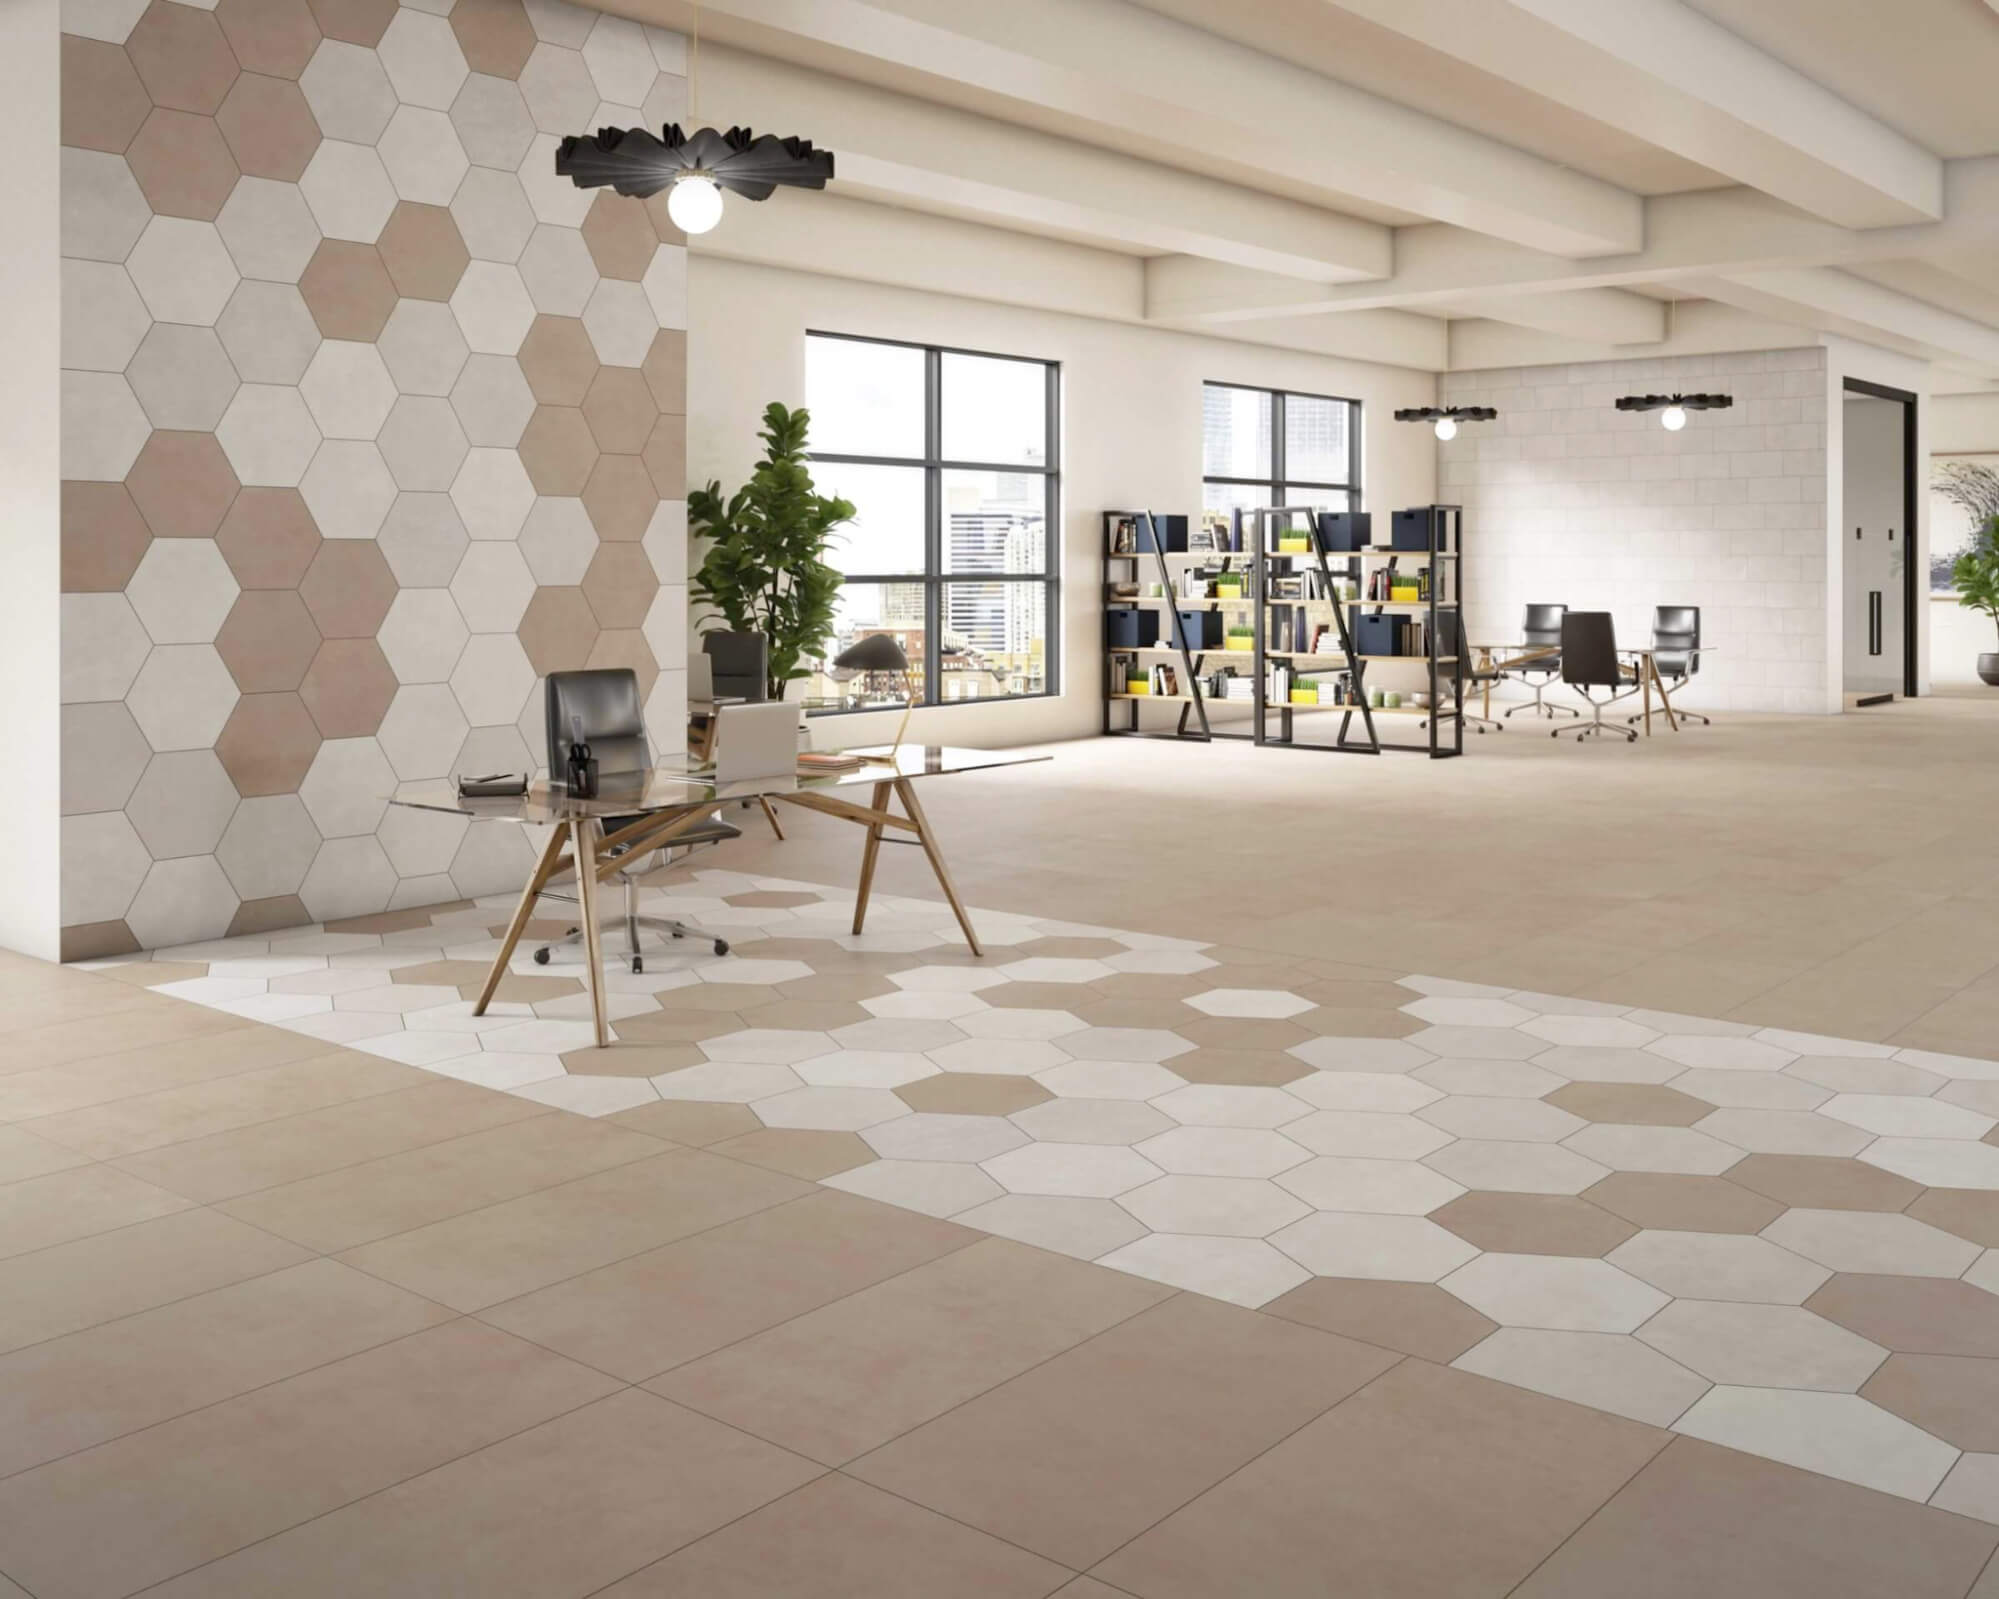
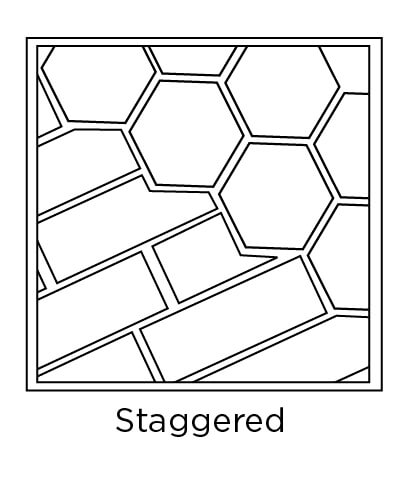
Can’t choose just one pattern? You don’t have to!
Incorporate your favorite tile patterns into another tile pattern or even another material by creating a staggered transition (as in the first photo) or a clean shift (as in the second photo).
Floor Tile Pattern Ideas With Three Tiles
Create an even more complex design with a three-tile pattern.
43. Linear Stack


The repeating motif in the linear stack pattern involves three different tile sizes — a square, a large rectangle, and a long, thin rectangle tile — eight tiles total.
In one row, lay (from bottom up) a square, a thin rectangle, a large rectangle tile and another thin rectangle tile. In the row to the right, lay a medium rectangle tile, a thin rectangle tile, a square tile and another thin rectangle tile. Then, just repeat!
44. Block

A large square, a rectangular tile, and a small square combine to create an upside-down repeated L shape in the block tile pattern.
45. Divisible
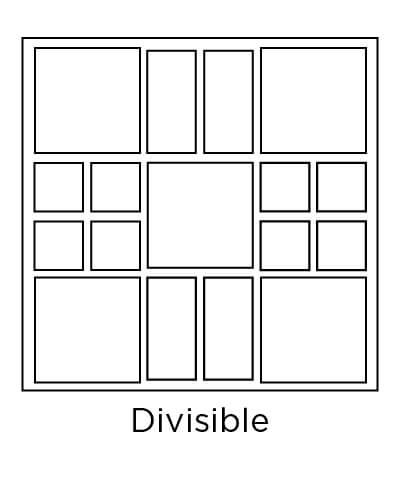
How many ways can you divide a square? That’s the question behind the divisible tile pattern, which visualizes a square, another one cut in half vertically, and a third one cut into four equal pieces.
46. Trellis

This pattern explains itself: Large and small squares, and rectangular tiles combine to create the look of a trellis.
47. Block Trellis

The block trellis tile pattern is essentially the trellis pattern using tiles that are twice as large. While the larger tiles make it slightly harder to distinguish the trellis pattern, they also make the design more suitable for larger floor spaces.
48. Vectored

Tetris, anyone?
That’s what we recall when looking at the vectored tile pattern, which conjoins large squares, small squares, and rectangles in a unique fashion.
49. Broken Joint

It’s the block floor tile pattern rotated.
50. Soldiered
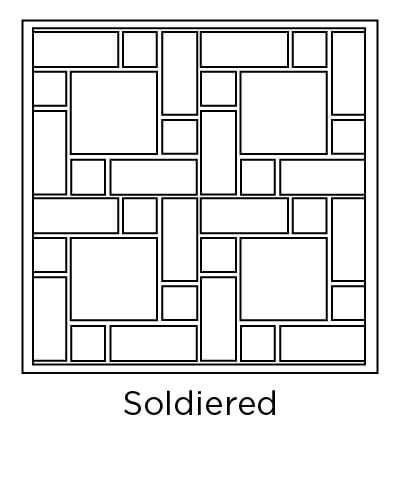
In the soldiered tile pattern, a row of alternating small squares and rectangles surrounds a large square tile on all sides.
51. Plain Weave

The plain weave pattern consists of a large square next to a small square tile stacked atop a horizontal rectangle tile.
52. Tip Toe
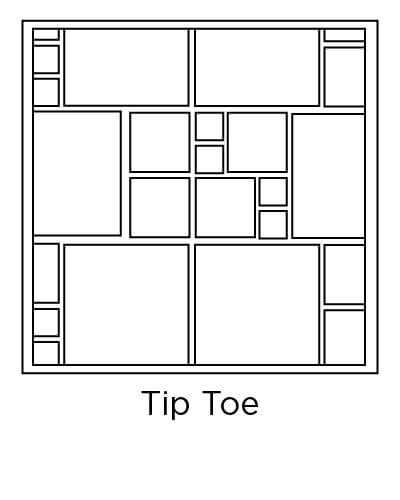
Ten square tiles in three different sizes combine to create the tip toe pattern.
53. Triad Hopscotch

As its name suggests, the triad hopscotch pattern is essentially the hopscotch pattern with one more tile size thrown into the mix. The result: an even more playful look.
54. Modular Rectangle

The modular rectangle pattern consists of 10 small, medium, and large square tiles combined to form a rectangle.
55. Layered Corridor

The layered corridor pattern is similar to its namesake, the corridor pattern. The difference is that the layered corridor pattern creates additional small “corridors” by adding rows of smaller square tiles.
56. Modular Corridor

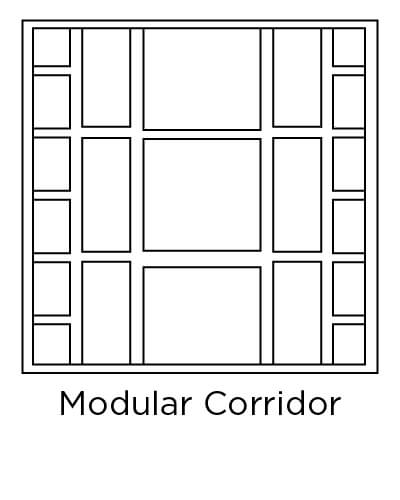
The modular corridor pattern is more a twist on the layered corridor pattern than it is on the traditional corridor pattern. Simply lay the layered corridor version without any offset between the tiles.
57. Checkered Diamond

Here’s a tile pattern fit for royalty. Diagonally laid squares are surrounded by rectangular tiles on their sides and square tiles at their corners.
58. Staggered Vertical Brickwork
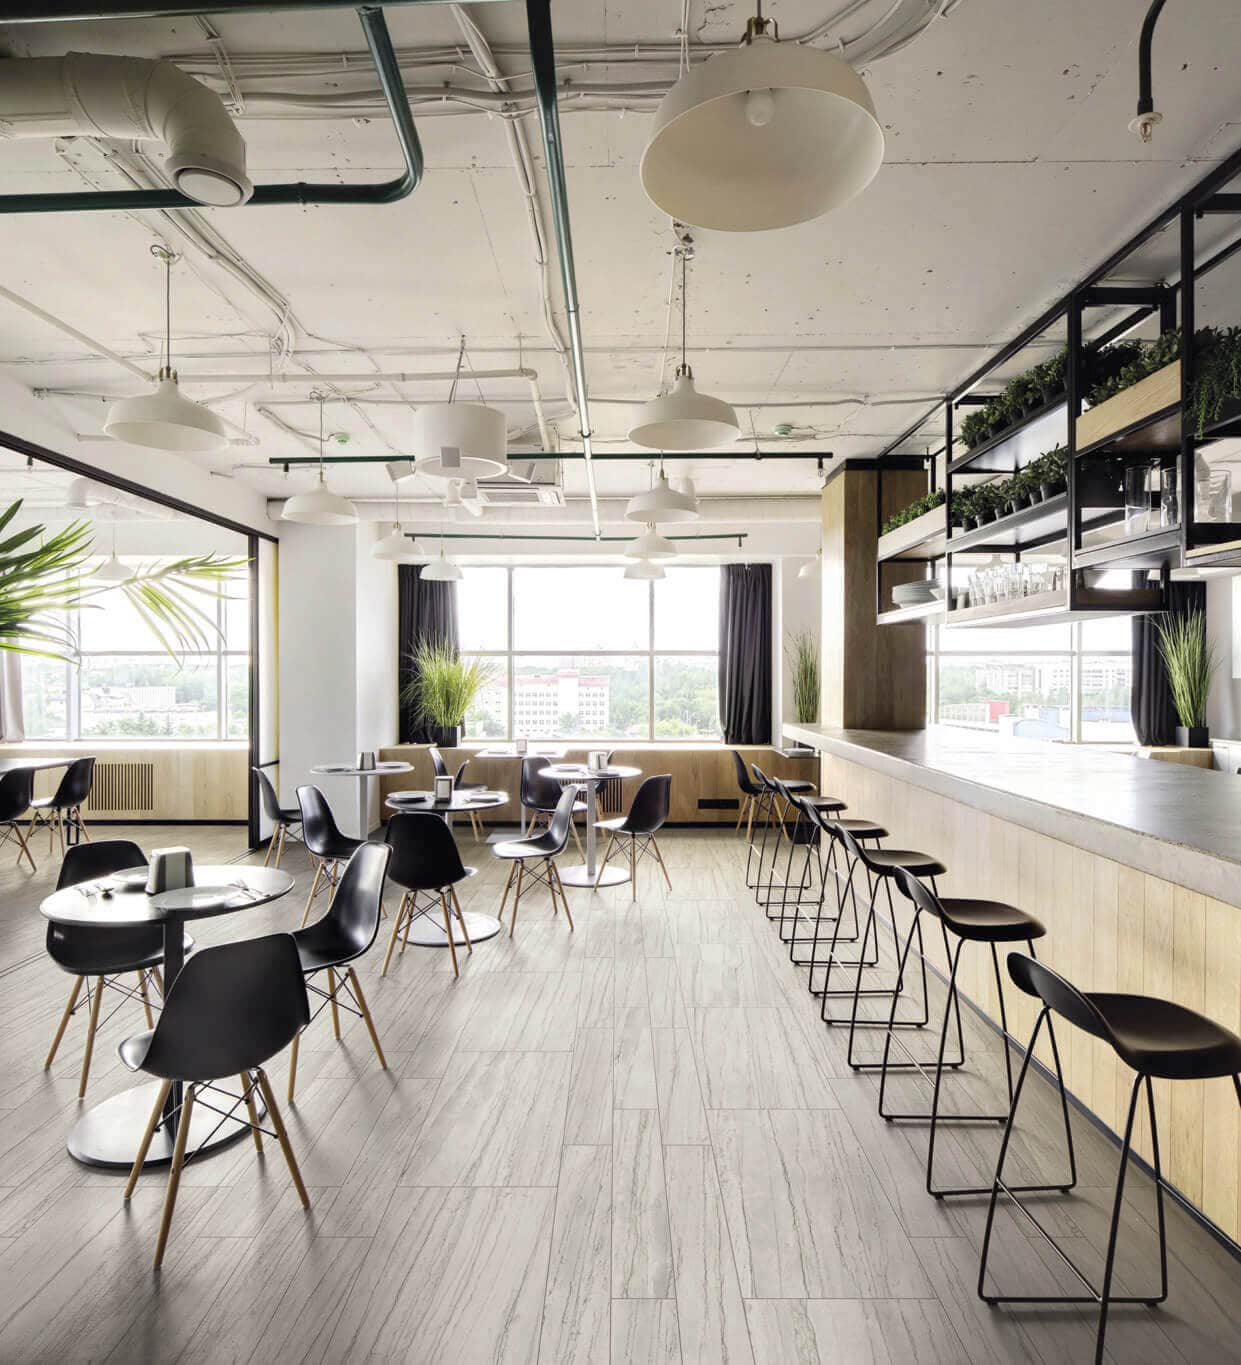

Similar to the brickwork (or subway tile) pattern, the staggered vertical brickwork pattern is nevertheless much more complex. Rather than staggering one size of rectangle tile, it works with three different sizes — one per column.
Floor Tile Pattern Ideas With Four or More Tiles
To maximize your layout possibilities and design potential, use four or more tile shapes and/or sizes in your pattern. These four-tile patterns can lend creativity to any space and design aesthetic.
Note: The more types of tiles you use, the more complicated it will be to lay your tile pattern. We recommend working with a qualified tile installer for these multiple-tile patterns to ensure your layout is consistent.
59. Cypress

Small and large square and rectangle tiles combine beautifully in this pattern. The large number of tiles in each repeating motif creates the look of randomly combined tiles. But if you look closely enough, you’ll spot the pattern.
60. Interlocked
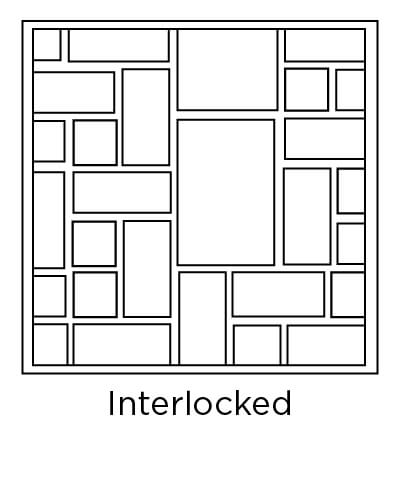
The interlocked pattern is similar to the cypress pattern, but it involves more small tiles and more tiles in each repeating motif. The result is a much more visually complex design.
61. Kaleidoscope
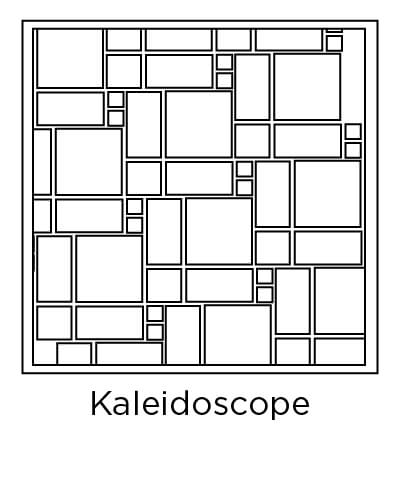
Considering its name, the kaleidoscope pattern is actually much simpler than you’d expect. Four different tiles — and only six tiles total — make up a straightforward motif.
62. Brick Joint

The brick joint pattern looks — and is — very simple, but don’t let that fool you when it’s time to lay your tiles. A 25% offset between each motif may make the pattern much more complicated to lay than you’d think.
63. Paredon
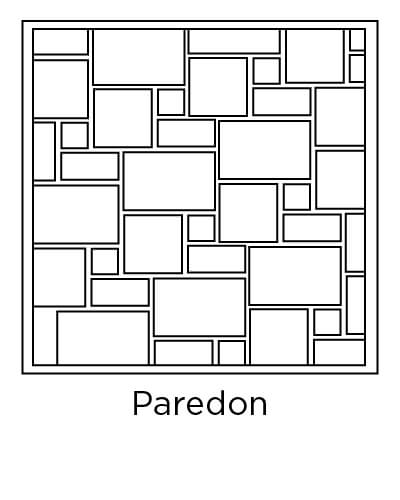
The paredon tile pattern includes 18 tiles in each motif, including small squares, large squares, small rectangles, and large rectangles. However, because none of the tiles are very large (the largest is 8 x 12), you can get away with using the pattern in rooms that aren’t too spacious.
64. Large-Format Paredon

The large-format paredon pattern is exactly the same as the original version, except the tiles are twice as large. Naturally, you’ll want to avoid using this layout in small spaces — you won’t have enough space to complete or repeat the pattern.
65. Modified Hopscotch

The modified hopscotch pattern maintains the playfulness of the original hopscotch pattern, but it adds two more 6 x 6 tiles, one 12 x 18 tile, and one 18 x 18 tile.
66. Modular Pinwheel

The modular pinwheel pattern is reminiscent of the original pinwheel layout, even if it’s difficult to tell at first. It opts for fewer and larger tiles to create the pinwheel shape, and then it cuts off the design mid-pinwheel.
67. Standard Versailles (French)
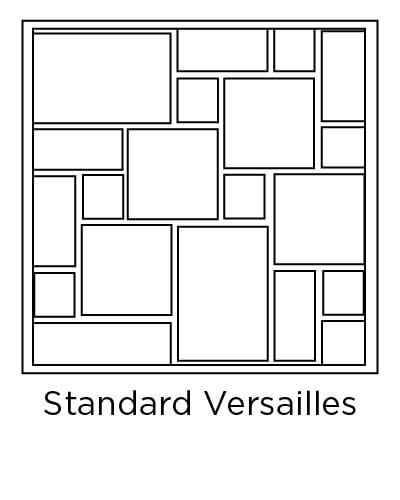
Also called the French tile pattern, the Versailles pattern involves large tiles (the smallest is 8 x 8) and a total of 12 tiles per motif. This makes the Versailles pattern perfect for creating a random look in large floor spaces.
68. Modular Versailles (French)
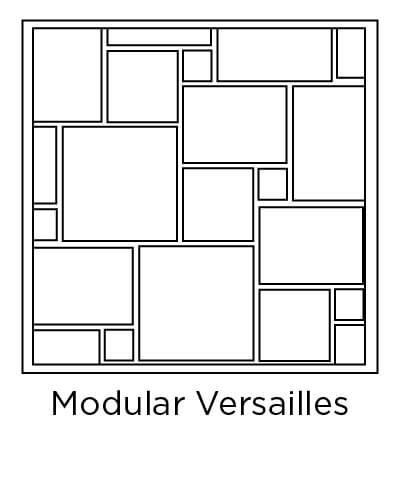
Containing only four tiles per motif, the modular Versailles pattern is a much simpler version of its namesake.
69. Palatial Versailles (French)
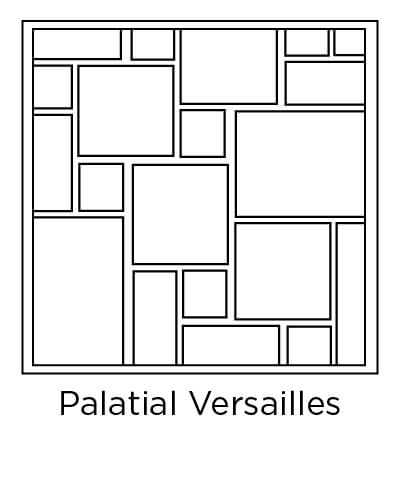
The palatial Versailles pattern contains the same number and types of tiles as the standard version, but it has a slightly different layout.
70. Interlocking Modular

A highly complex layout, the interlocking modular pattern involves 49 tiles per motif. The number of tiles, as well as the fact that they’re on the larger side (the smallest is 10 x 10), means you’d best reserve this pattern for very large floor spaces.
Floor Tile Patterns With Borders
Tile borders are great for adding visual interest, differentiating certain spaces in your home, and creating a unique focal point.
People also often use tile borders to create “rug” floor tile patterns. The tile rug pattern creates the illusion of a rug in tile flooring.
The diamond rug tile pattern is the most popular. This design inserts a bordered diamond grid into the surrounding tile patterns (usually a basic straight grid) to resemble a rug. Consider using the tile rug floor tile pattern for entryways to mark the change from outdoor to indoor space, as well as hallways and living rooms.
However, you can also use tile borders simply to mix things up with your tile pattern!
Now, let’s look at some of your tile border options.
71. Footpath Border
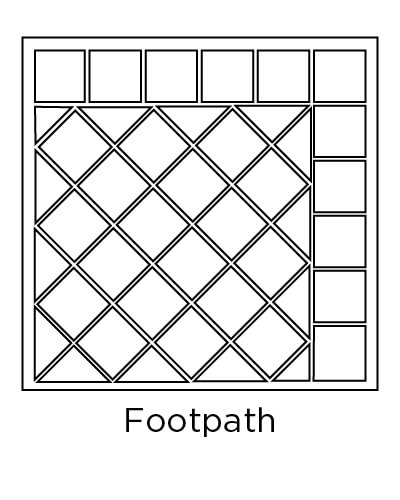
Simply outline your tile pattern with a single row of square mosaic tiles.
72. Alternating Border
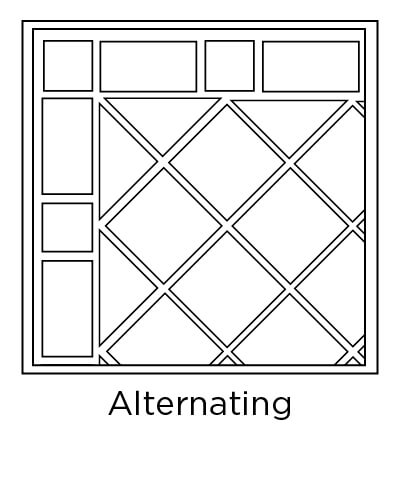
Alternate square tiles and rectangle tiles to create the alternating border.
73. Diagonal Rug Border

Outline your tile pattern with small horizontal rectangle tiles, and use square tiles for the corners.
74. Corner Cut Border
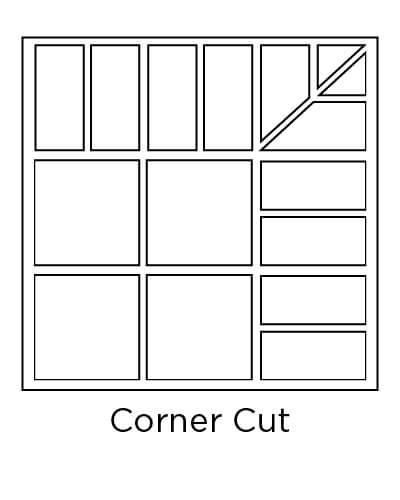
Outline your tile pattern with small vertical rectangle tiles, and use a chevron-like design for the corners.
75. Diamond Border

Alternate diagonally laid square tiles with triangle tiles in an hourglass shape to achieve the diamond border.
76. T-Cross Border
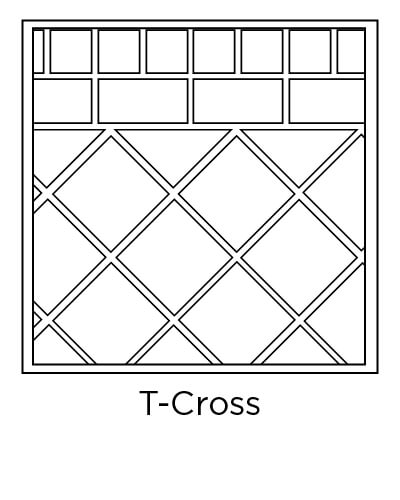
Two rows of tiles make up the T-cross border: first, a row of horizontal rectangle tiles and then a row of square tiles, either one large tile or multiple smaller tiles.
77. Windmill Border


A mosaic tile windmill — either in a single row or multiple rows — creates this tile border.
78. Accent Insert Border
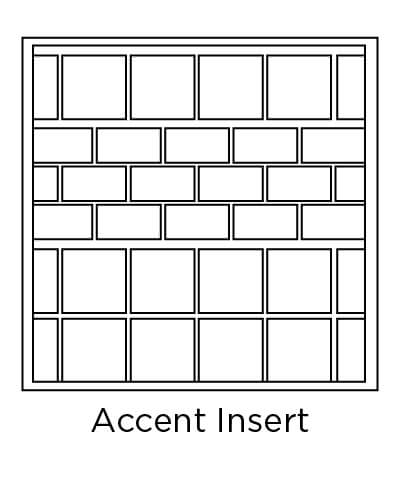
The accent insert border contains rows of mosaic subway tile, which a simple row of square tiles then borders.
79. Border Inset
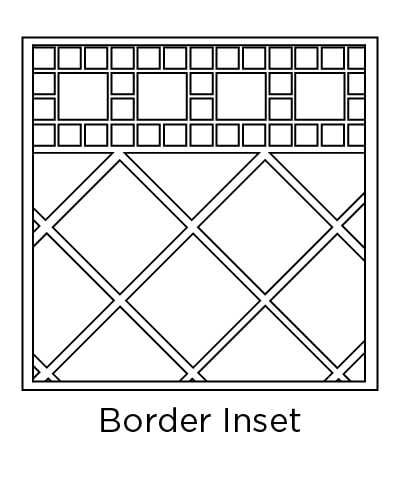
The border inset contains borders within borders. Even smaller squares surround small square tiles to make up this border.
But wait, there’s more —
Bonus: Parquet Floor Tile
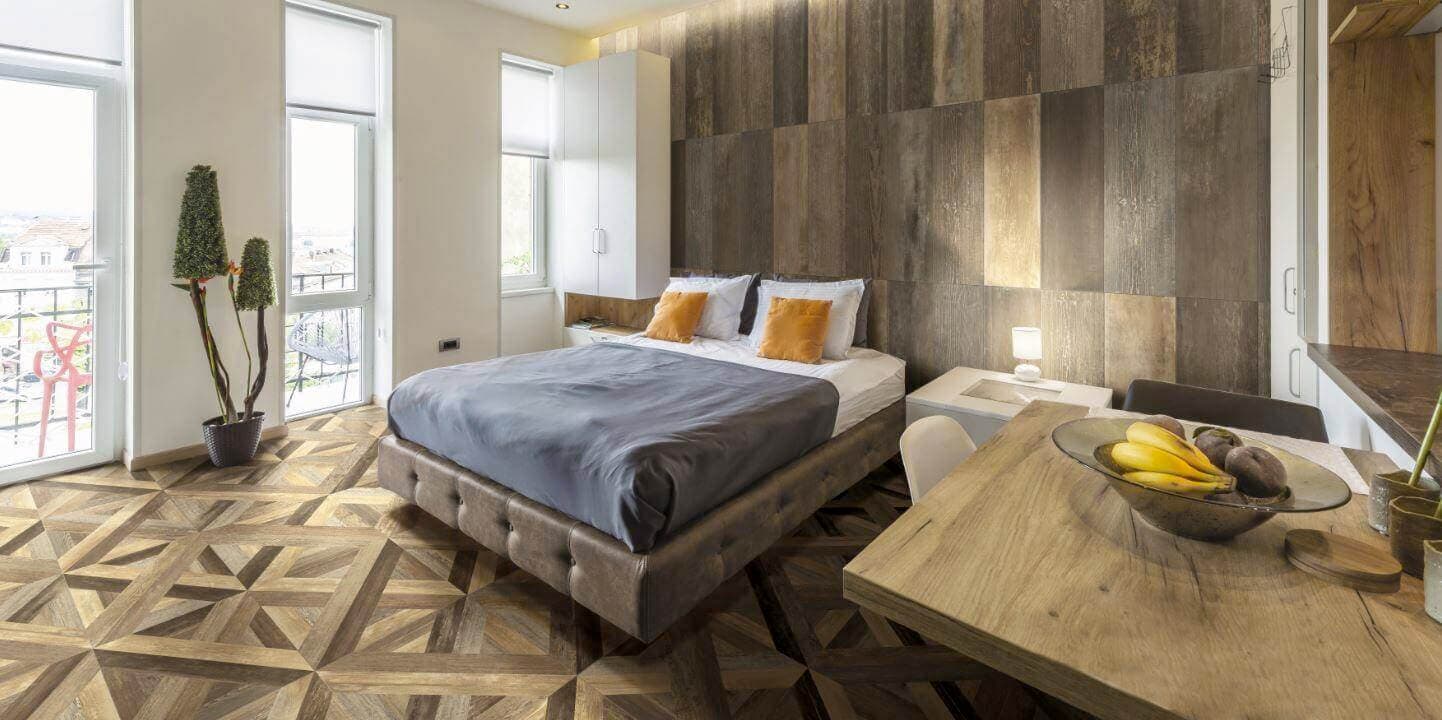
We would be remiss not to share that intricate floor patterns can be created on a SINGLE tile. In this flooring example, the large-format square ceramic tiles are laid in a simple square grid but note how the tiles together create a larger pattern. This exquisite look is achievable through a manufacturing advancement that bakes the texture and tones of wood and parquet design into the ceramic tile.
The Perfect Pattern for Every Space
Ceramic tile brings easy elegance and durability to any room.
Choose one of these popular tile patterns for your floor, or go for your own unique design — only ceramic tile gives you such wide options to express your personality.
Reference our template of tile layout patterns for some of the most popular patterns. Then, add your personal touch for a beautiful, durable floor that will stand up to years under your feet.
Speak with a Certified Ceramic Tile Professional to get help with your ideas and then discuss your choices with your tile installer to experiment and get creative!
For more tips on selecting your floor tile and planning your project, download our Tile Buying Guide.

