When we speak from the heart, our gifts convey thoughtfulness and the intimacy of knowing someone well. Rather than spending time shopping for someone, we spend our time lovingly making something that is as unique as they are. These are the gifts we know will be treasured because they also carry a bit of our love.
Inspired by our previous blog, 10 Leftover Tile Craft Projects, we’ve gathered three of our most-loved, low-cost, DIY craft projects perfect for expressing your heart on Valentine’s Day. What we love most about these projects is that no previous experience is necessary to make beautiful, expressive, mini masterpieces!
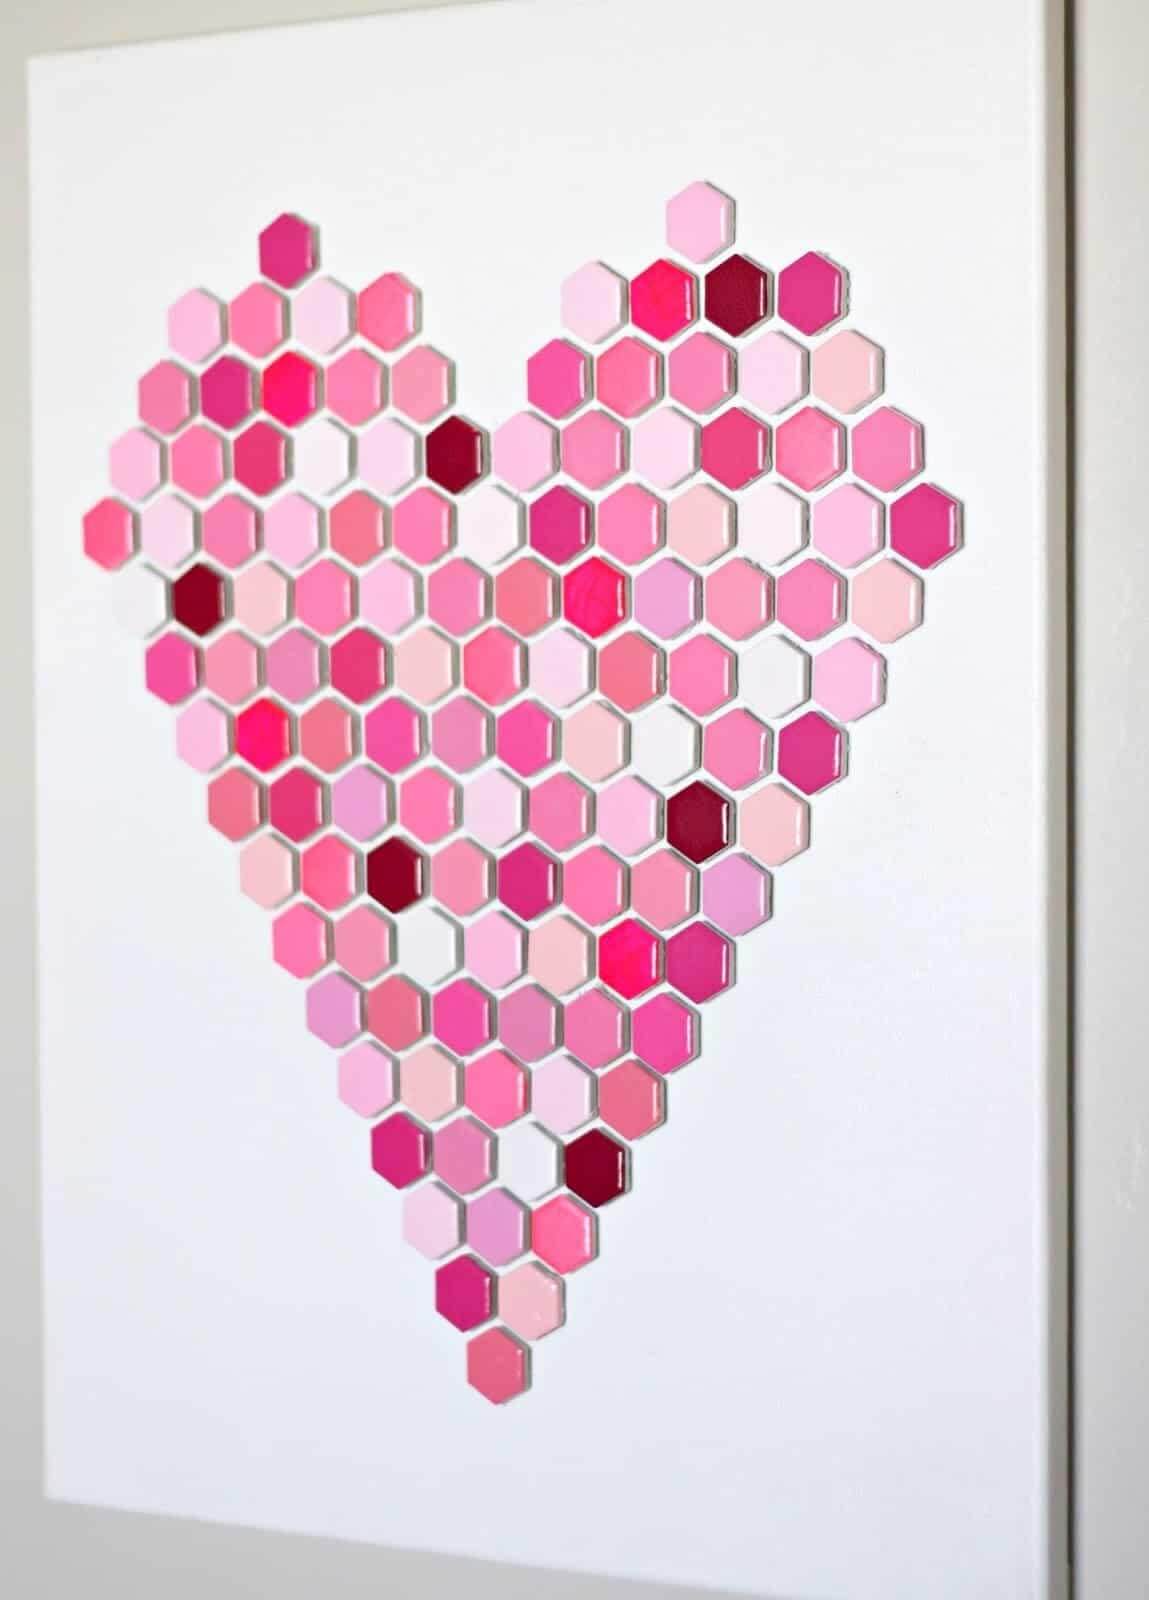
Hexagon Heart Wall Art
@PrettyLifeGirls at DIY Candy begins this project by painting the tiles in various colors of acrylic paint (this may take two or three coats). Once your tiles are dry, arrange them on the canvas in your preferred shape. We think a heart shape is oh, so “lovely,” but a little planning could yield any shape you want. Be sure to keep consistent space around each tile (see image). Then let your glue gun do the work of securing the tiles to the canvas!
You’ll need:
- One sheet of white ceramic hexagon tiles
- Canvas
- Acrylic paint and paintbrush
- Hot glue gun and sticks
We found painting the tiles to be the most time-consuming. We wondered if we could use spray paint but that option was far more expensive and less satisfying to our crafty hearts. The key to your success with this craft is prearranging the tiles before gluing them down.
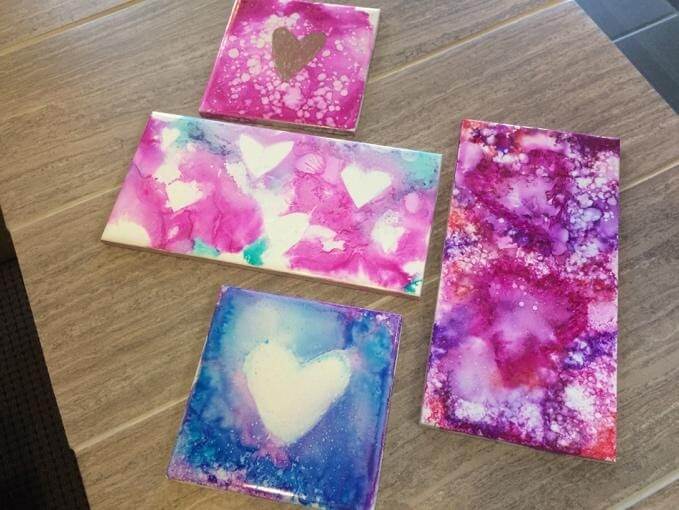
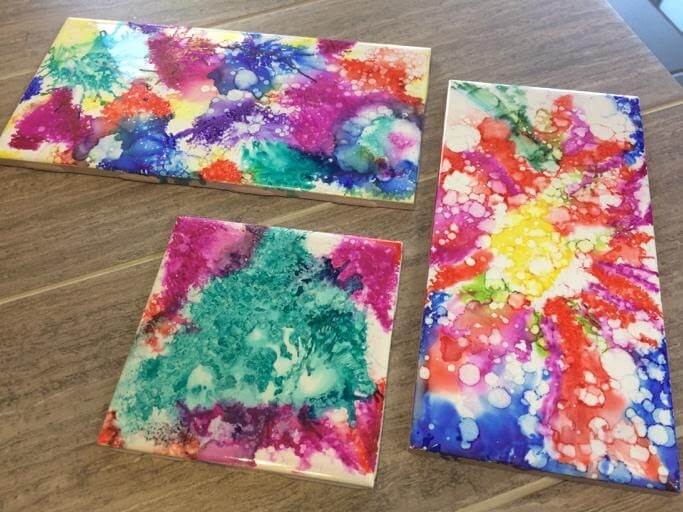
Sharpie Art Tile
Maybe your valentine loves a certain adult beverage or soda and a beautiful place to park their beverage will always remind them of you. There are a number of ways to approach this craft (and it’s fun to try every one of these techniques).
You’ll need:
- Rubbing Alcohol (91% isopropyl)
- Spray bottle, small paint brush, and/or dropper
- Sharpies in various colors
- White glossy ceramic tiles (a common size is 4.25-inch x 4.25-inch), cleaned and dry
- Krylon UV-Resistant Clear Acrylic Coating
- 4-inch square cork coasters, or sheet cork cut to the size of your tiles, less 0.25 inches
- Hot glue gun and sticks, if needed
- Canned air (optional)
- Nitrile/latex gloves (optional)
- Tape (optional)
Style for Real Life advises in her instructions not to worry about the drawing you make on the tiles with your Sharpies — just get busy adding sections of color. Once you have some color down, add small drops of alcohol, either by dropping with your brush or using a spray bottle (our preference). After you apply the alcohol, you can tilt the tile to move the colors around, carefully use canned air, use a dry brush, or just let the alcohol spread on its own.
We followed some tips from Sarah Jane’s Craft Blog and her work using alcohol ink on tiles, and masked out shapes (hearts!) for yet another technique that reveals the shapes once the tape is removed. We tried this idea by cutting the shapes out of sticky mailing labels. You can also use a tissue slightly damp with alcohol and remove paint in areas to make shapes. Sarah Jane also gave us the idea to experiment with canned air.
Each technique of applying the alcohol and moving it around / removing it creates a different effect. We encourage you to experiment and find your own method!
This craft is totally forgiving. If you don’t like what you’ve created, just clean the tile with some alcohol and start over or add some color and build layers of colors on top of each other.
Once you love your art, give it a spray of acrylic coating to protect it and use the glue gun to back it with cork (some cork is self-stick).
Notes: We found the red and black Sharpies harder to spread, so use these colors when you want a more defined area. We REALLY wanted to use metallic Sharpies but they do not spread at all—best to use the metallic colors for specific drawing, or your signature!
Our video gives you a closer look at the Sharpie tile art fun we had making this craft.
Tic-Tac-Toe (Hugs and Kisses) Tiles
To Work With My Hands developed this craft, and we are so in love with this holiday decor that doubles as a game!

You’ll need:
- 10 4.25-inch x 4.25-inch glossy white ceramic tiles
- Six sheets of scrapbook paper:
- Two same sheets for the X tile backgrounds, cut into five 4.25-inch x 4.25-inch squares
- Two same sheets for the O tile backgrounds, cut into five 4.25-inch x 4.25-inch squares
- Two same sheets that you will use to cut out five Xs and five Os
- Mod Podge for paper
- Sponge brush
- Plastic card (like a credit card, for smoothing the papers down)
- Paper-cutter
- Scissors
- One each X and O 3-inch wood letters
- Ten 4-inch square cork coasters or sheet cork cut to the size of your tiles, less 0.25 inches
- Hot glue gun and sticks, if needed
- Ribbon (optional)
Start off by applying the backgrounds to the tiles with the Mod Podge. Trace the wooden letters on THE BACK of your other sheets and cut out five Xs and five Os, then apply to your X and O backgrounds. Right about now you are probably getting your hugs and kisses mixed up, so our tip is to keep your backgrounds and letters organized together.
Finish off your game pieces with a final layer or two of Mod Podge. (Keep these layers thin and don’t try to apply a thick coat or your brush strokes will show.) When dry, use the glue gun to back your tiles with cork (some cork is self-stick). To Work With My Hands tied the Xs and Os with a pretty ribbon to give as a gift, but we are keeping ours to bring back that lovin’ feeling around the house this February.
Cross our hearts, you’ll love making all of these Valentine’s Day crafts so much that you won’t be able to part with them. (Hint: have extra supplies on hand!)